JavaScript - The Complete Guide - Maximilian Schwarzmüller
Introduction
Introduction
Maximilian Schwarzmüller is a freelance web developer who will be teaching this course. He has been working with JavaScript for years. By the end of this course I will also be a capable JavaScript developer. This course is for everyone, by starting with the very basics and working our way up into more advanced topics, everyone can follow along. In addition to being a complete guide, this course is also a complete reference that we can come back to. This is a practice oriented course that includes quizzes, projects, assignments, and real world scenarios.
What is JavaScript?
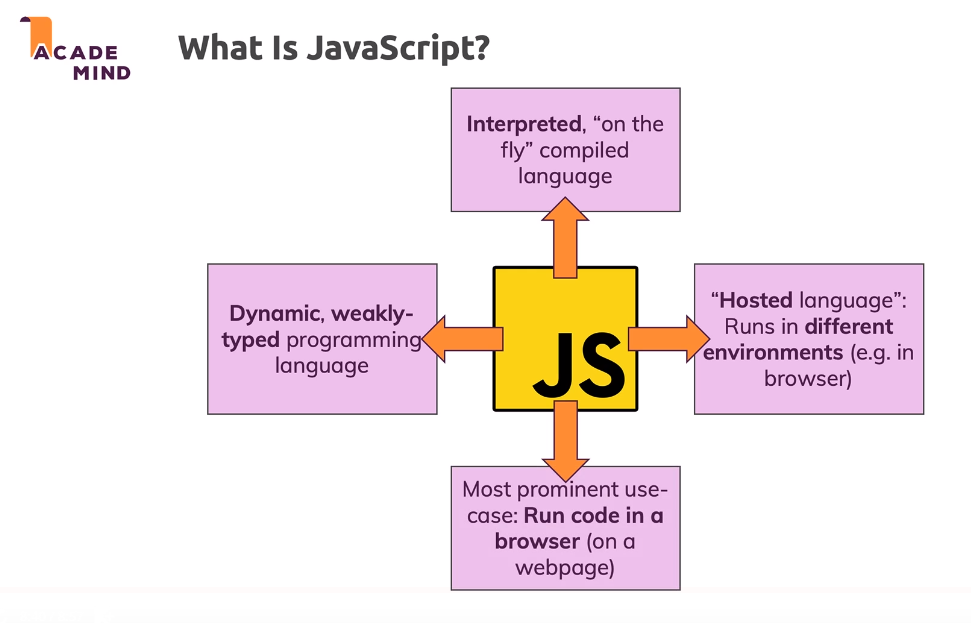
JavaScript is a dynamic, weakly typed programming language which is compiled at runtime. It can be executed as part of a webpage in a browser or directly on any machine ("host environment").
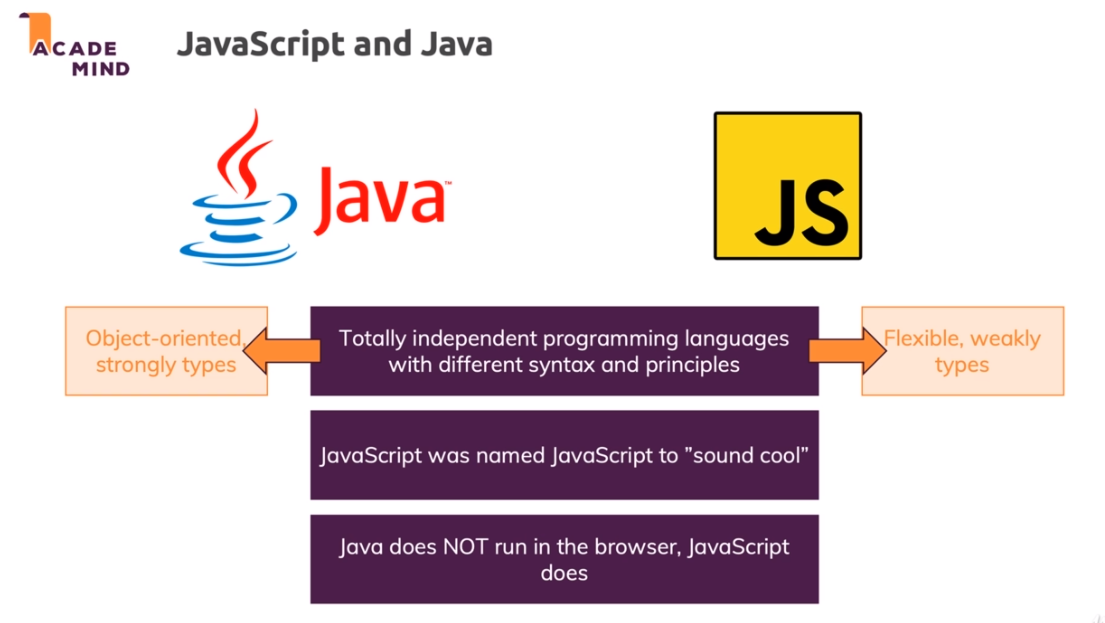
JavaScript was created to make webpages more dynamic (e.g. change content on a page directly from inside the browser). Originally, it was called LiveScript, but due to the popularity of Java, it was renamed to JavaScript.
JavaScript is totally independent from Java and has nothing in common with Java!
How do webpages work?

JavaScript helps us to make a simple page like this more reactive by skipping the second request / response flow in some circumstances by changing the already loaded page. Then it can do something on the already loaded page instead of requesting a whole new page.
-/-
An Introduction to JavaScript (JavaScript.Info)
What is JavaScript? What Does It Do, and What Is It Used For? (YouTube)
JavaScript in Action
Say we had an HTML file with a link to another page, but that other page was simply a sentence of text serving as a definition for something on the first page. It would be much easier if we could just have that link make a little popup or overlay on the first screen instead of opening a whole new page. We can do that with JavaScript.
All we need to do is write our JavaScript and add it in a script tag in our HTML page.
We don't have to fully understand what is happening with the JavaScript code right now.
A visual example of JavaScript definitions and what it is.
-/-
JavaScript date and time (W3 Schools)
Join our Online Learning Community
As a student of this course you also get free access to our “Academind Community” on Discord:
There, you can find like-minded people, discuss issues, help each other, share progress,successes and ideas and simply have a good time!
I believe that you learn the most if you don’t learn alone but find learning partners and other people with similar interests. Our community is a great place for this - it’s the perfect complimentary resource for this course.
Joining it is of course free and 100% optional.
How JavaScript Is Executed
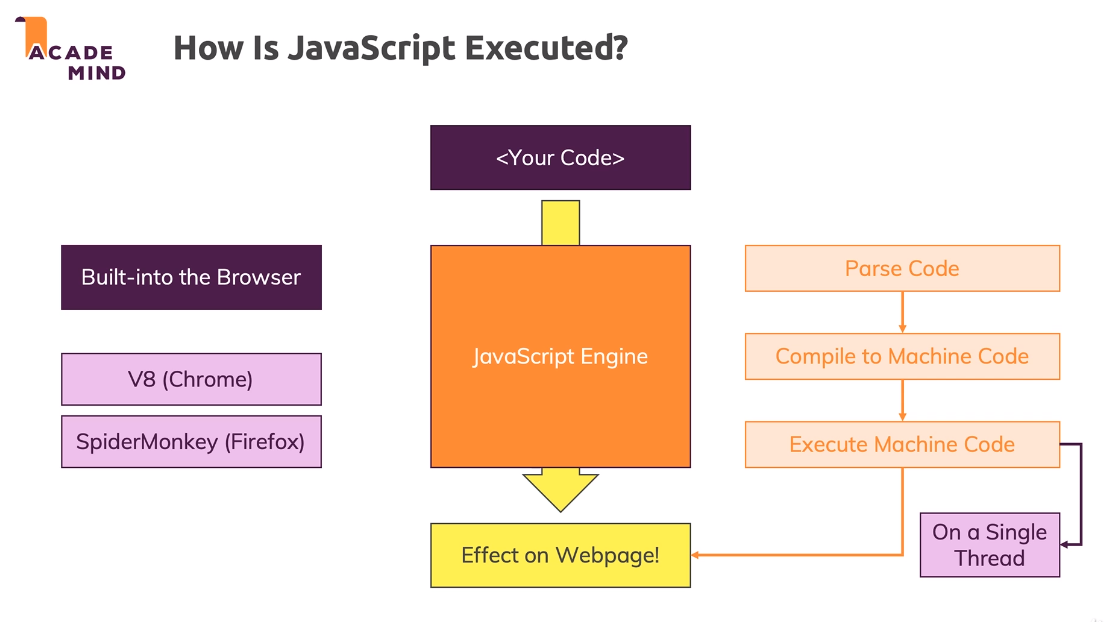
Say we write our JavaScript code, and we want it to be executed in the browser and have some effect on our webpage. To do this execution we need a JavaScript engine. These JavaScript engines are built into modern web browsers. Chrome's engine is called V8, Firefox's engine is called SpiderMonkey. The job of these engines is to parse our JavaScript code, then on-the-fly compile our code into Machine Code, and then execute the Machine Code. This whole process is done on a single thread. After all this happens then our code is executed and can then interact with the webpage.
-/-
How JavaScript works in browser and node? (Medium)
How JavaScript works: inside the V8 engine (Medium)
Javascript Tutorial | How Does JS Work? (YouTube)
How the JavaScript engine works | The basics (YouTube)
Dynamic vs Weakly Typed Languages
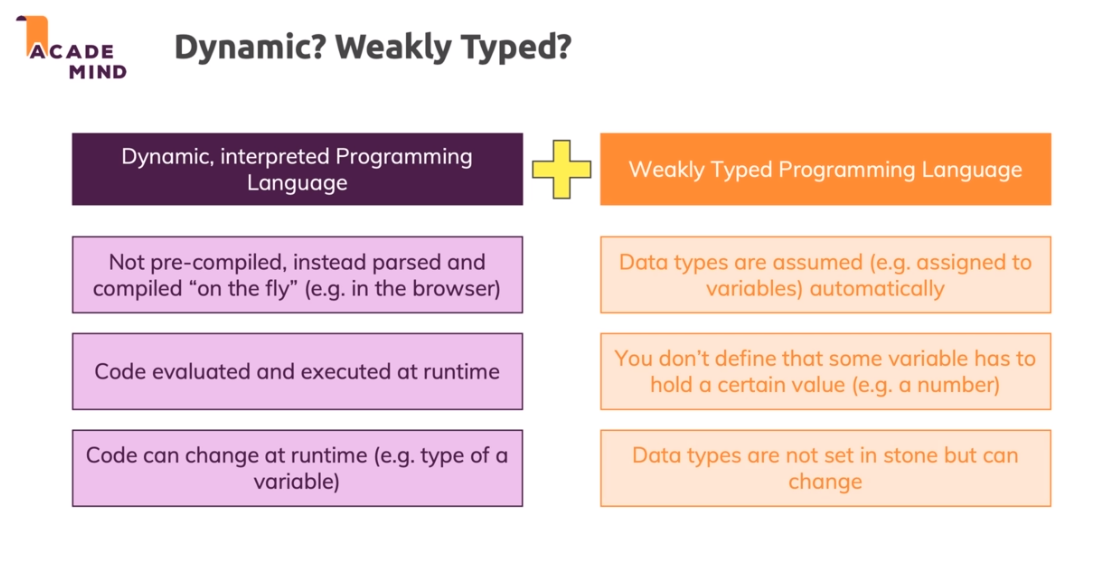
JavaScript is a Dynamic, Interpreted Programming Language, but it is also a Weakly Typed Programming Language. But what is the difference between these terms?
-/-
Static/Dynamic vs Strong/Weak Programming Languages (StackOverflow)
Statically vs Dynamically Typed Languages (Medium)
Typing: Static vs Dynamic, Weak vs. Strong / Intro to JavaScript ES6 (YouTube)
JavaScript Runs in a Host Environment
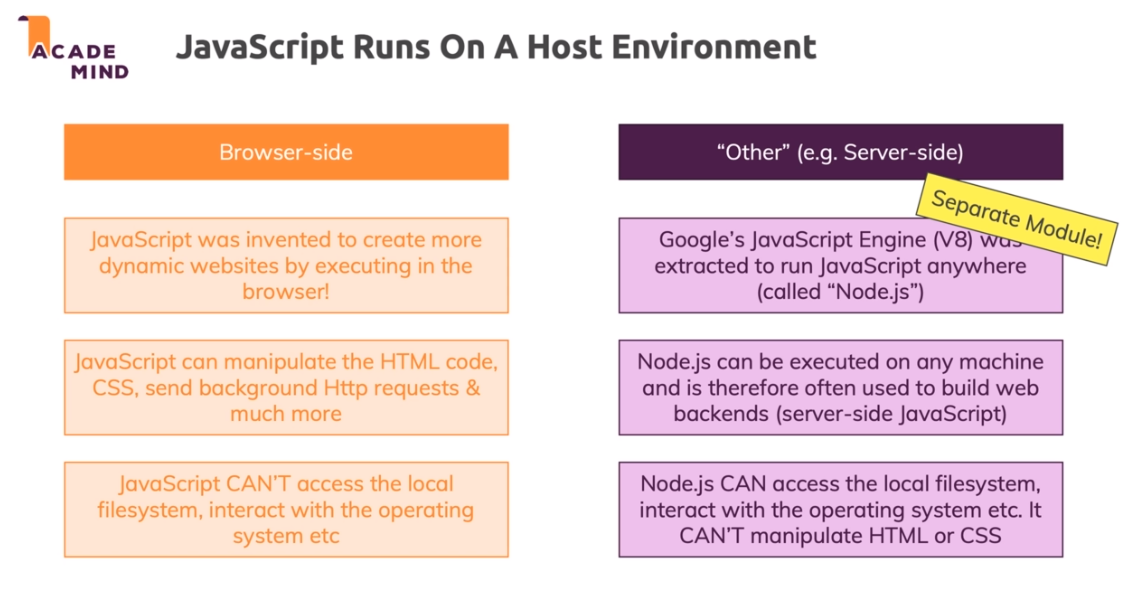
JavaScript can run in more than one environment. The most common use would be in the browser, but it can also run on the server side of things. Each host environment has pros and cons and limitations to what it can do.
-/-
Browser environment, specs (JavaScript.Info)
Course Outline - What Is in the Course?
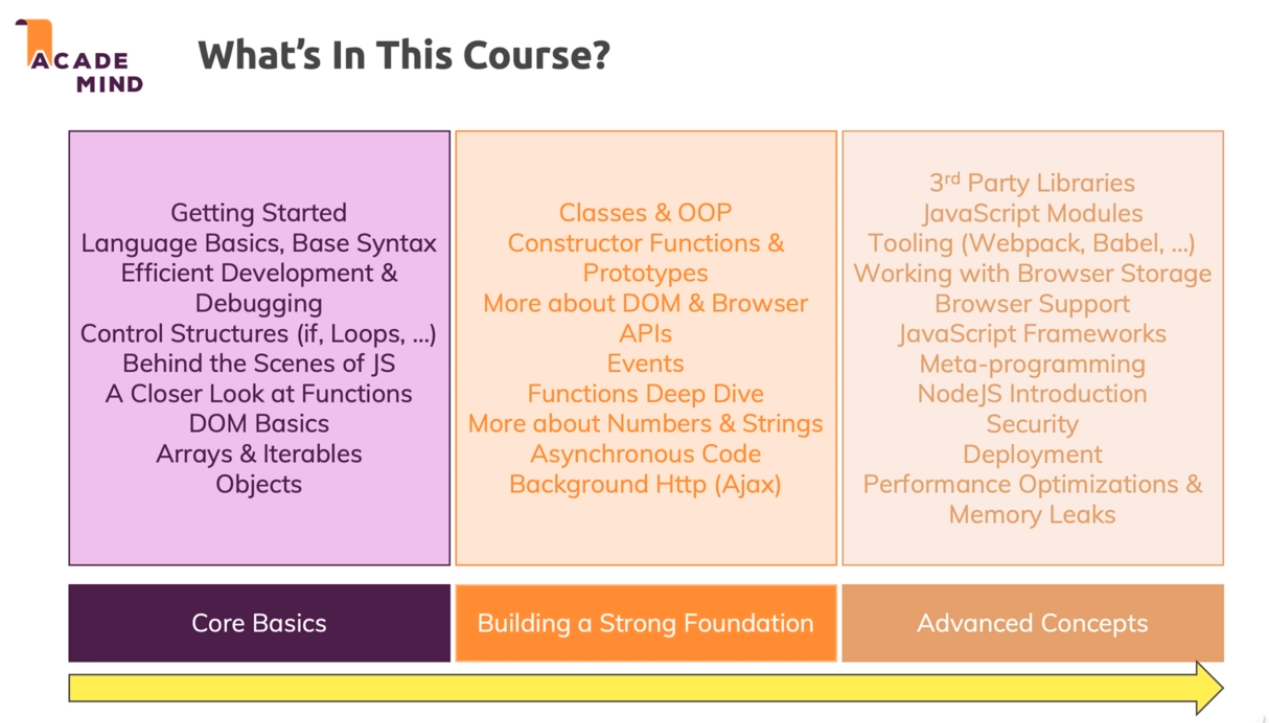
We can split the course into 3 main modules. The Core Basics, then Building a Strong Foundation, and finally the Advanced Concepts. This course can be done in order, out of order, or it can be used as a reference for someone looking for a specific concept.
How to Get the Most out of This Course
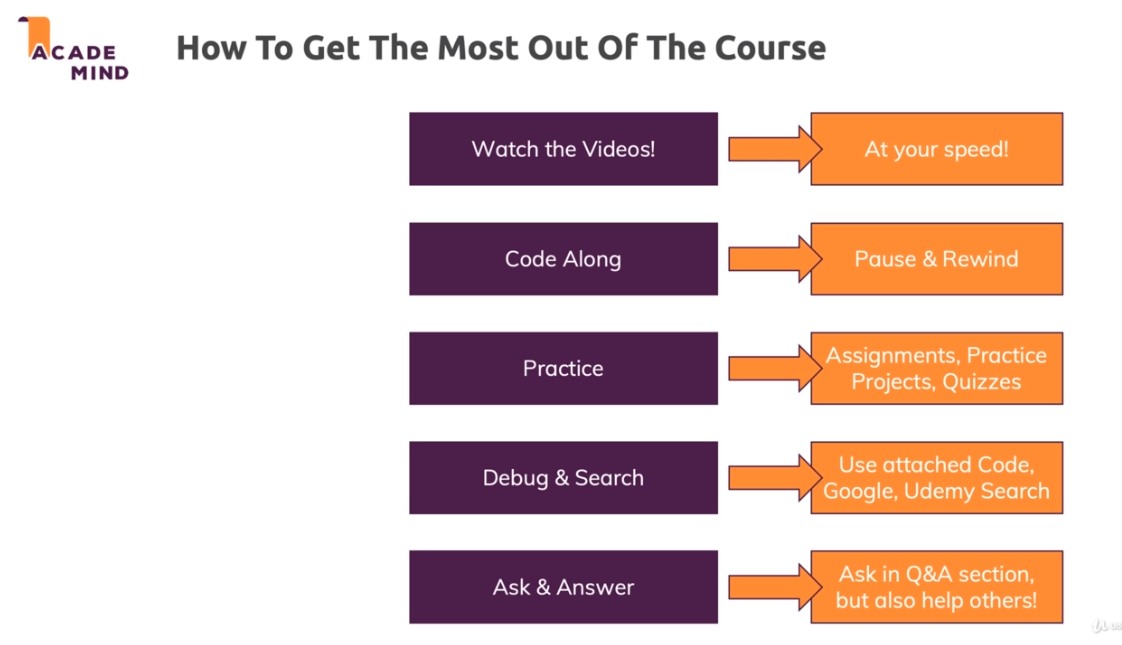
Watch the videos at your own pace and code along. Try and implement some features before Max does to make sure you have a full understanding of the concepts. Practice what you learned by doing the included quizzes, projects, and practice problems. If you run into an error, try debugging your code or searching for the problem online. If you get stuck and can't find it online, ask and answer questions in the Q+A or on the Discord server.
Using Course Resources
This is a video-on-demand course, hence information is of course conveyed via videos - but that does not mean that you only get videos!
Instead, you find plenty of useful additional course resources which you absolutely should utilize as well!
To be precise, you'll find these kind of resources in the course:
Course Source Code: All code that we write is attached to multiple lectures per module (= a snapshot of the code we wrote up to that lecture) and always attached to the last lecture of each module (all snapshots for that module and the final code)
Extra Information / Text Lectures: The vast majority of the course lectures are video lectures - but occasionally, you'll find a text lecture with some extra information here and there. These extra lectures (which are part of the regular course flow) provide some extra information that is "nice to have" or which is simply easier to refer to in written form
Course Slides: The focus of this course is on writing code but some theoretical foundations are best set via slides. All crucial slides are attached to the lectures in which they are shown.
External Links: From time to time I also link to some external resources (I do mention it in the video then, you also will often find some extra, optional links at the end of each module, in the last lecture). Going through these resources is of course not required but might be helpful to dive deeper or explore certain niche or highly advanced concepts a bit closer.
JavaScript vs Java
JavaScript's environment is in the browser, but Java's environment is server-side.
Visualization of JavaScript vs Java.
Now what's the difference between client-side and server-side JavaScript? The main differences are the environments and which API's we have access to.
Visualization of client-side vs server-side JavaScript.

We will mainly be focusing on the browser-side of things in this course... why is that? Because it's JavaScript's origin. There are no alternatives to JavaScript in the browser. Node.JS uses the same syntax so we can always learn it later. Finally, it's more fun to learn it when we can see what it's doing and interact with it more visually.
A Brief History of JavaScript
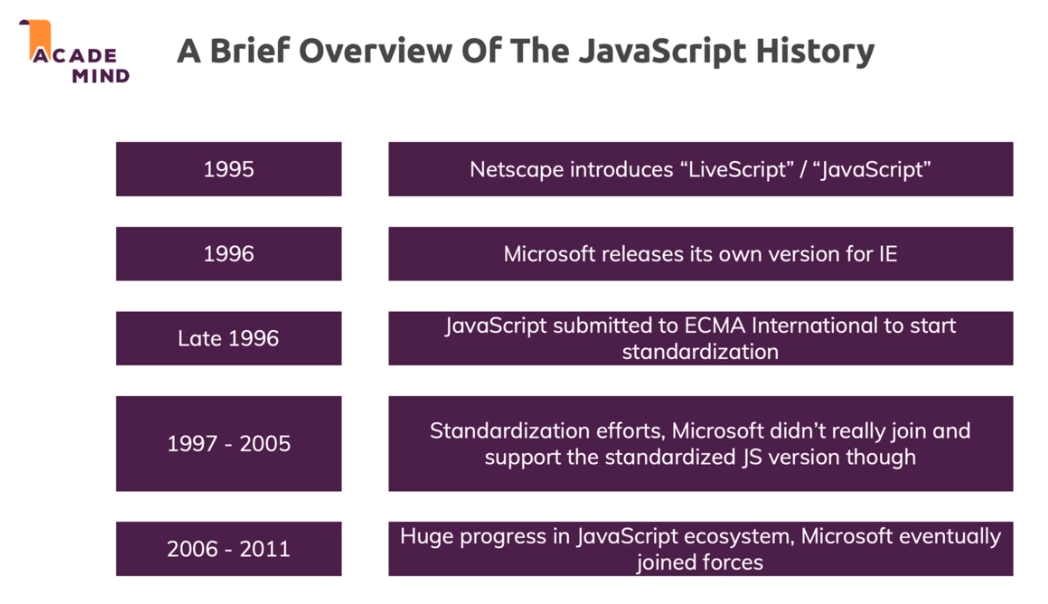
JavaScript was originally introduced as LiveScript, and competed with Microsoft's version for awhile before being submitted to the ECMA International Foundation to start standardization. Microsoft joined the standardization efforts later on and by 2006 we had the ECMAscript numbering.
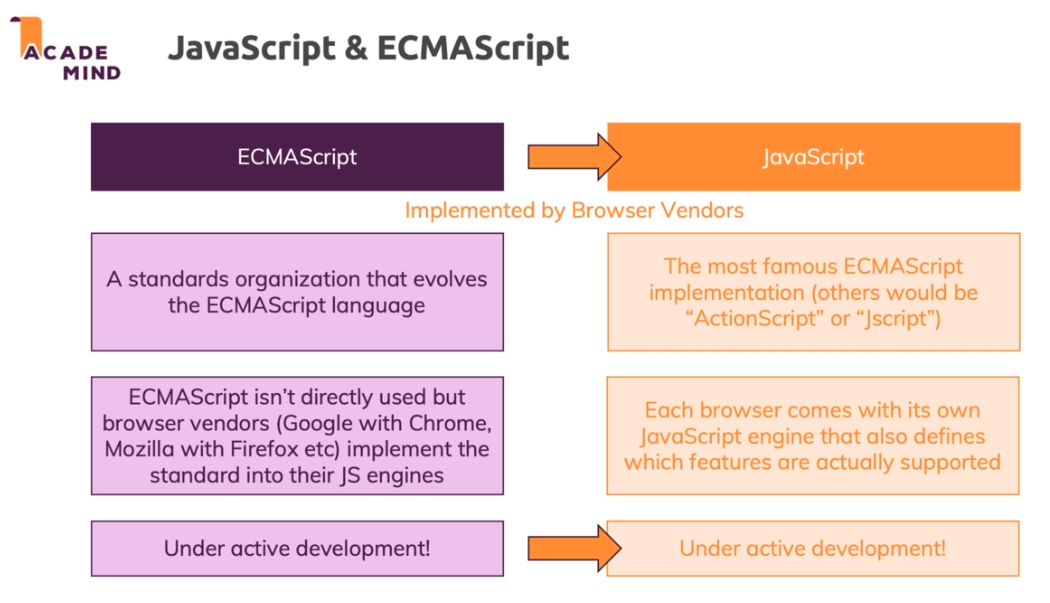
JavaScript & ECMAScript
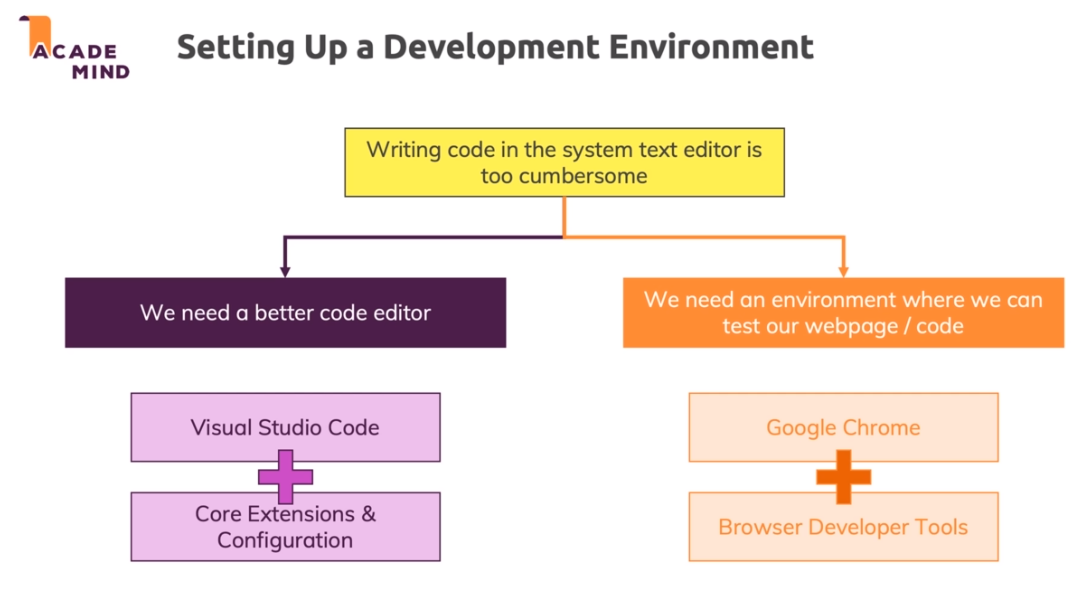
Setting Up a Development Environment
For our IDE (Integrated Development Environment) and Browser / Dev Tools we will be using Visual Studio Code and Google Chrome / Chrome Dev Tools
Course FAQs
Here are some common questions about this course:
How long will it take me to complete the course?
This is impossible to answer, seriously. An online course is not a sprint - it's a marathon. You can certainly rush through the course by ramping up the video playback speed to 2x and maybe skipping some videos. You'll then only take half the total hours of that course to complete it (or shorter). But chances are you won't learn much if you do that.
Instead, you should go through the videos carefully - pause occasionally and code along on your own. Maybe even go back to lectures or whole modules you completed in the past to validate that you really understood the concepts taught there.
Code along and maybe even explore with your own projects (or deviate the projects shown by me in the course).
These are the things that turn you into a real developer and it will of course take some time to gain confidence with the JavaScript language.
What are the course prerequisites?
NO JavaScript knowledge is required, basic HTML + CSS knowledge + web dev knowledge is recommended.
You should have a basic understanding of how the web works and which parts are involved (servers, browser, ...). This article + video can get you started: How the Web Works
Do I need to know anything about JavaScript to start with this course?
Please check the course landing page (and the question right above this one): NO JavaScript knowledge is required.
Do I need to know any HTML or CSS to dive into this course?
Please check the course landing page (and the question two questions above this one): Basic HTML + CSS knowledge can help but technically also isn't required.
You should have a basic understanding of how the web works and which parts are involved (servers, browser, ...).
Does this course teach Node.js?
I focus on the browser since we got some visual output there - which in my opinion makes learning more fun. But the language is the same, so what you learn here of course also applies to Node.js.
There are some differences, some APIs (= functionalities) which only work in the browser or only work in Node.js - but I will highlight those and I also have a complete module where I provide a basic introduction to Node.js and how JavaScript works there.
Which version of JavaScript does this course teach?
The latest version. You learn modern JavaScript in this course!
Do I need a Mac to follow along?
No, absolutely not - any operating system works. I record the course on a Mac, that does not mean that you have to use one as well. There will be no differences.
Which browser should I use to follow along? I recommend using Google Chrome. JavaScript works in all browser but to ensure that everything works just as shown in the videos, you should use the same browser I use there => Chrome.
Later in the course, you'll find a whole module about JavaScript and which features are supported by different browsers. This then allows you to fine-tune your scripts to different browsers (spoiler: In many cases, no adjustments are required!).
Is XYZ included in the course (e.g. "Is JavaScript security included in the course?")
Please check the course curriculum - you find all the content there. If something isn't listed there at all, chances are it's not included but asking doesn't hurt. But please first look, then ask. :) You can also search the course.
Basics: Variables, Data Types, Operators & Functions
Module Introduction
In this module, we'll be diving into the core syntax, then into understanding variables and data types, then into working with operators, then finally, into functions.
Setting up the Project
We downloaded the project from Udemy and will learn some core JavaScript logic by building out the logic for a calculator application.
More on Version Control & Git
Git is a version control system that helps you control your source code. For example, you can easily go back to older states of your code or revert in case you mess up your code.
Using it, is totally optional! It's also not a tool that's related to JavaScript in any way - you can indeed use Git in ANY (programming) project.
Since it is optional and not directly related to JavaScript, I will not dive into Git in this course. Nonetheless, it's definitely a tool worth learning for every developer.
In case you are interested, this tutorial gets you started:
Besides local version control and code management, you can also push your projects and all your commits ("snapshots") to remote storages. The most prominent (free!) remote service is GitHub:
You can learn more about it here:
Also check out the official docs:
Adding JavaScript to the Website
There are a few ways that we can add JavaScript code to our page. We can include it in a script tag in our HTML and write the JavaScript code inside of our HTML file. This method is not recommended however because our file gets long and complicated.
Another way that we can add it is with script src and then we can point the src to our external file. It can look something like this script src="app.js".
We do have to be careful where in our HTML we place the script src because JavaScript executes from top to bottom so placing something at the very top might ruin the order of execution.
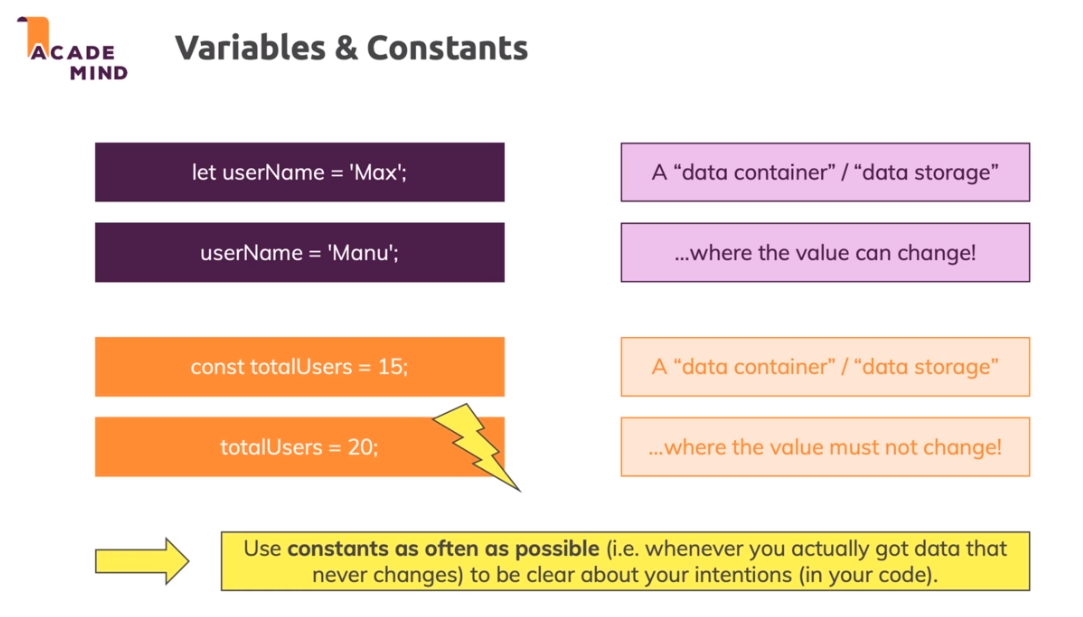
Introducing Variables & Constants
Variables and Constants are a core concept of most programming languages. A variable is a data container, or data storage. In JavaScript we create a variable with let, then add a name to our variable, and then we assign it a value. Once a variable is created, we can reassign the value of that variable without saying let again, like
userName = "Nick".
Then we have const. const is still a data container, but it's different than variables in the fact that you can't reassign the values of const. So why would you want to use const? What if we had some code that we wanted to reference without having to type it out every time? and then you changed that code? if it was in a let you would have to go all over changing things but with const it's just one change. You typically want to use const as often as possible.
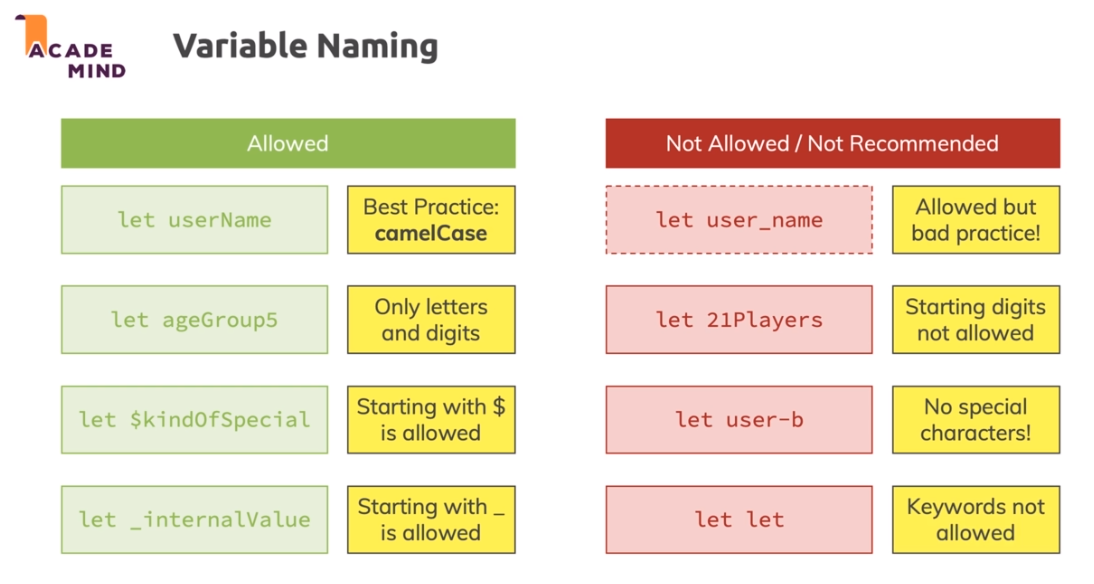
Declaring & Defining Variables
What's allowed and not allowed in naming our variables?
We can leave our variable uninitialized like this let currentResult;.
If we have a variable like that, it means that the variable is declared, but not initialized.
To end lines of code, you can end it with a semicolon ;, or you can go without it. It's recommended to end your code with semicolons because this is how many other programming languages require you to end things.
Working with Variables & Operators
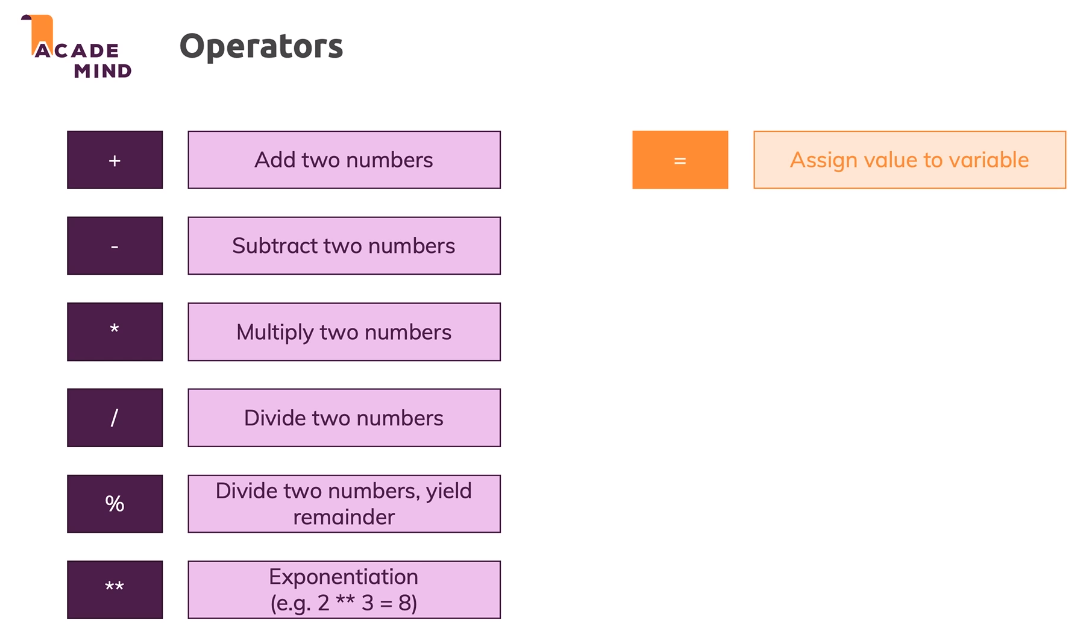
We can assign new values to existing variables like in the example. When we do this, we are using the +, = operators.
Some other operators include...
We are not limited in the number of operators we can use per line, we can use all of the operators available. JavaScript will follow all the rules of math.
If we want the code above to have more operators they will still follow the rules of math.
Quiz 1: Variables & Operators
Understanding the Starting Code
What we see happening in the example code is we're calling a function and replacing the function parameters with our own data.
Data Types: Numbers & Strings (Text)
What data types are available for us in JavaScript? Some simple data types include numbers and strings.
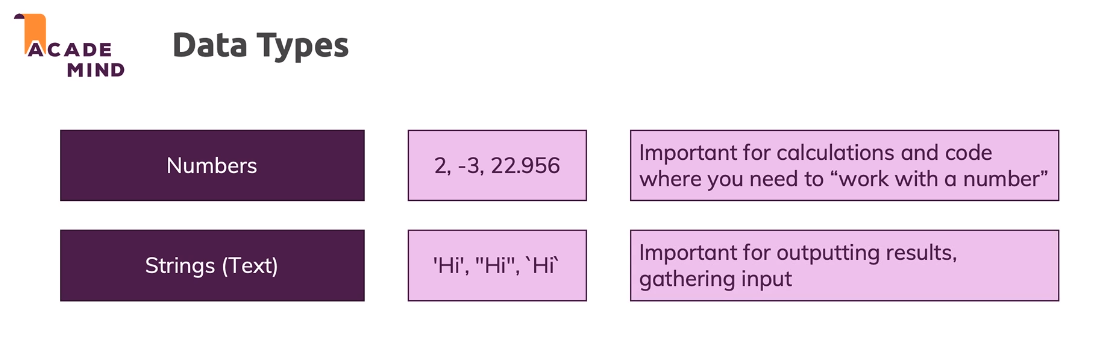
When we place something inside of quotes, it becomes a string. Even if there is math and operators involved it will still be treated as a string.
We can add strings together using the + operator like this.
let calculationDescription = "(" + currentResult + " + 10) * 3 / 2 - 1";
Using Constants
HTML and JavaScript gets executed from top to bottom.
Using const in a script means that we can assign variables to our const value and the const will never change. In the example below, we assign our const to have a value of 0 , then we assign other variables to the value of our const but it never changes its value.
More on Strings
When writing strings, you can use either single or double quotes. Either one is acceptable, as long as you stay consistent throughout your code. If you open a string in single quotes you have to close it in single quotes.
If we wanted to print quotes in our string we would have to use the opposite of what we opened our string in. For example a single quote string could have a quote inside the string by using double quotes.
Using backticks ` in our strings give us access to a special syntax. We can use a dollar sign and a parenthesis to add variables into our strings. This method is called template literal.
With template literals we can easily add line breaks into our strings. We can also add indentation and other forms of white space. Sometimes the line breaks or white space won't show in our HTML because it automatically strips out the white space.
There are some shortcuts we can use to add line breaks and other forms of white space in our strings
\n is a line break, \' outputs a single quote, \\ outputs a backslash, and there are many others.
Escapable JavaScript Characters
Assignment 1: Time to Practice: Variables, Constants, Operators & Core Data Types
Create two variables: One that holds a fictional user input (a number of your choice) and one that holds no value initially (e.g. "result").
Set the result variable to 18 plus the value stored in user input.
Add three additional lines of code where you change the result variable again (by subtracting a value of your choice, multiplying it and dividing it).
Think about the value stored in the user input variable you also created - did that value change?
alert() the result and the user input variables (in two separate alert() calls).
Solution
Introducing Functions
Functions are like code-on-demand. We can define a function and pass in some values, then come back later and call the function with our own values passed in.
Adding a Custom Function
We can define a function at the bottom of the page and then we can call that function at the top of the page and it will still be valid. Function hoisting is very different that variable hoisting in that you can define and call more dynamically.
When writing functions we add function parameters. Parameters are like variables, but you don't access them outside of the function, you use them when you're calling the function so that it has some data to use.
We can also define const or let inside of our functions. These variables will then be tied to the function and not available in the global scope.
Functions can be called multiple times and you can then input different parameters in different calls to get different results. Functions can also have as many parameters as we need it to have.
Code Styles, Conventions & Syntax
Writing Clean AND Correct Code
Returning Values
The return keyword allows us to return a value that's stored in a variable as a result of the function call.
Basically what return does is it allows us to access the variable from outside the function scope. So if we have our const returnResult and we try to console.log that from outside of the function before we add a return we will get an error saying that it is undefined. But if we return that variable then it becomes available to the global scope.
We can assign new variables do different functions if they have different parameters.
The (Un)Importance of Code Order
When using const and let, you need to declare the variable before you call it. So if you try and call a variable at the top of the script and it's actually declared at the bottom, you'll get an error.
Functions act very differently. We can call a function before we declare/define it. The reason for this is that JavaScript/Browser runs through our script from top to bottom and reads the functions that are available and automatically pulls them to the top. So we can call at the top of our script even if it's written at the bottom of the script.
An Introduction to Global & Local Scope
If we define a variable outside of our function, in the global scope, we can access that variable in the function. But, if we define a variable inside of our function, in the local scope, we can't access that variable outside of the function in the global scope.
Functions can be called inside of functions. Also, variables can be defined in the global scope and the same variable can be defined in the local scope, this is known as a "shadowed variable".
Shadowed Variables
You learned about local ("function-internal") variables and global variables.
What happens if you have this code?
This will actually show an alert that says 'Max' (NOT 'Manu').
You might've expected that an error gets thrown because we use and declare userName more than once - and as you learned, that is not allowed.
It indeed is not allowed on the same level/ in the same scope.
So this would fail:
Why does it work in the first code snippet though?
Because we first create a global variable userName via
let userName = 'Max';
But then we never re-declare that on the global level (that would not be allowed).
We only declare another variable inside of the function. But since variables in functions get their own scope, JavaScript does something which is called "shadowing".
It creates a new variable on a different scope - this variables does not overwrite or remove the global variable by the way - both co-exist.
When referring to userName inside of the greetUser function we now always refer to the local, shadowed variable. Only if no such local variable existed, JavaScript would fall back to the global variable.
More About the "return" Statement
The return statement is useful for getting data out of functions, but it has other uses.
If something is added after a return statement, it won't be executed because return ends function execution.
Sometimes, return is used to end a function conditionally or naturally at the end of the function. This can be used in logical if statements.
Executing Functions "Indirectly"
We can use an event listener to execute our function "indirectly". variableName.addEventListener("click", functionName) this tells the browser that we want it to execute this function when a button is clicked. We don't add parameters to this function reference.
"Indirect" vs "Direct" Function Execution
It can be confusing to see that there seem to be two ways of executing a function:
add() vs add
It's important to understand why we have these "two ways"!
In general, you call a function that you defined by using its name (e.g. add) and adding parentheses (with any parameters the function might need - or empty parentheses if no parameters are required like in the above example).
add()
This is how you execute a function from your code. Whenever JavaScript encounters this statement, it goes ahead and runs the code in the function. Period!
Sometimes however, you don't want to execute the function immediately. You rather want to "tell JavaScript" that it should execute a certain function at some point in the future (e.g. when some event occurs).
That's when you don't directly call the function but when you instead just provide JavaScript with the name of the function.
someButton.addEventListener('click', add); This snippet would tell JavaScript: "Hey, when the button is clicked, go ahead and execute add." someButton.addEventListener('click', add()); would be wrong.
Why? Because JavaScript would encounter that line when it parses/ executes your script and register the event listener AND immediately execute add - because you added parentheses => That means (see above): "Please execute that function!".
Just writing add somewhere in your code would do nothing by the way:
Why? Because you just throw the name of the function in there but you don't give any other information to JavaScript. It basically doesn't know what to do with that name ("Should I run that when a click occurs? After a certain amount of time? I don't know...") and hence JavaScript kind of ignores this statement.
Basically, if you're calling a function inside of a addEventListener or "indirectly" you don't add the parenthesis, but if you're calling it outside of a function in the Global Scope then you need parenthesis with parameters.
Assignment 2: Time to Practice: Functions
Create two new functions: One that takes no parameters and simply shows an alert() with some text of your choice and one that receives a name as a parameter and then uses
alert()to output that name.Call both functions directly from your code.
Add an event listener to
task3Elementand attach it to the first function (the one without arguments). Click this task thereafter to verify whether it works.Add a brand-new function that takes three parameters (three strings, give them any names you want) that returns one combined string (where the three strings are concatenated).
Call that new function directly from your code and
alert()the result of that function.
Solution. Kept my own version for step 4 otherwise correct code.
Converting Data Types
Any user input we get from a HTML form will always be a string.
Even if the input element is set to type=number it will still provide a string.
To convert that string into a number, we can use the parse function. parseInt and parseFloat are our 2 options. parseInt will parse it into a number without decimal places. parseFloat parses it into a string with decimal places.
Another option is to add a + before the string. This will convert it into a number but it's not as explicit about what is going on behind the scenes and gives us less control over our decimal place numbers.
Mixing Numbers & Strings
You saw the example with a number and a "text number" being added
3 + '3' => '33'
in JavaScript.
That happens because the + operator also supports strings (for string concatenation).
It's the only arithmetic operator that supports strings though. For example, this will not work:
'hi' - 'i' => NaN
NaN is covered a little later, the core takeaway is that you can't generate a string of 'h' with the above code. Only + supports both strings and numbers.
Thankfully, JavaScript is pretty smart and therefore is actually able to handle this code:
3 \* '3' => 9
Please note: It yields the number (!) 9, NOT a string '9'!
Similarly, these operations also all work:
3 - '3' => 0
3 / '3' => 1
Just 3 + '3' yields '33' because here JavaScript uses the "I can combine text" mode of the + operator and generates a string instead of a number.
Splitting Code into Functions
When dynamically passing values in to a template literal, they are automatically converted to a string. If possible, avoid repeating code by splitting the code up into different functions so that if you need to change something you can change it in less places.
Connecting all Buttons to Functions
In this module we connected 2 separate JavaScript files and refactored our code. Some of the code that we refactored involved taking the result text, and adding the way it is generated into a function so that instead of making our own string result every time we call a different operator, we just call the function and pass in our own parameters.
Note: If we initialize a variable inside of a function and assign a value to it, we can then initialize the function of the same name and give it a new value inside of a different function. This is because variables that are made in functions are then tied to that function scoping.
Working with Code Comments
Adding comments to code can be helpful in understanding what is happening, as long as you keep it short and to the point. Instead of saying something like "This is a function", write something like "This function grabs data from the user input and runs the next function."
There are a couple ways to add comments in JavaScript files.
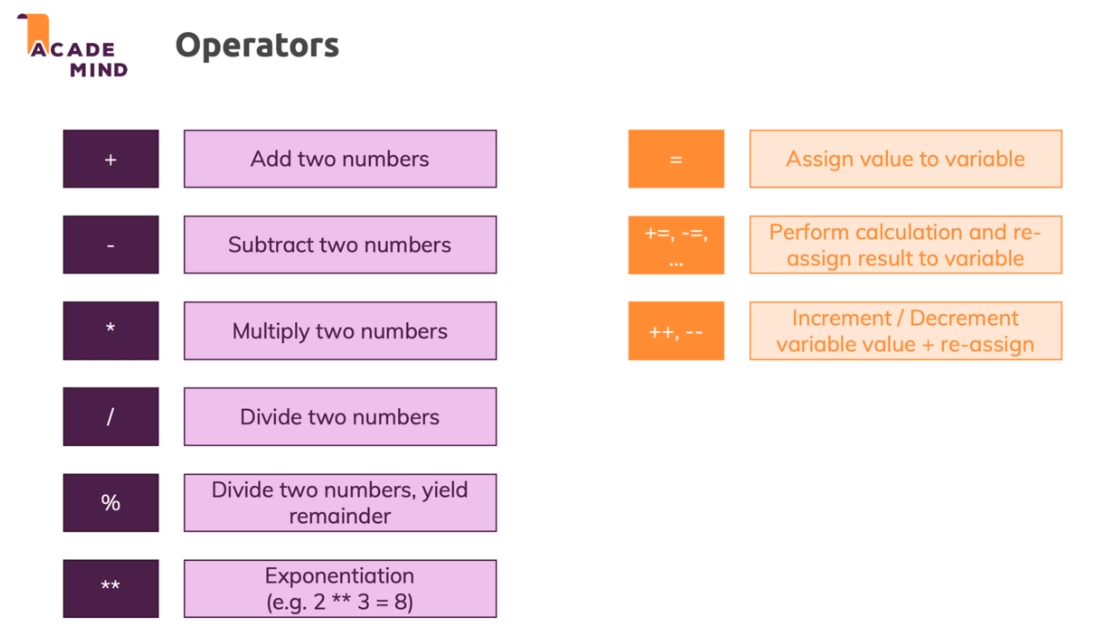
More Operators!
There are a few shortcut operators we can use to reduce our code size. Instead of saying const = const + value, we can use a shortcut
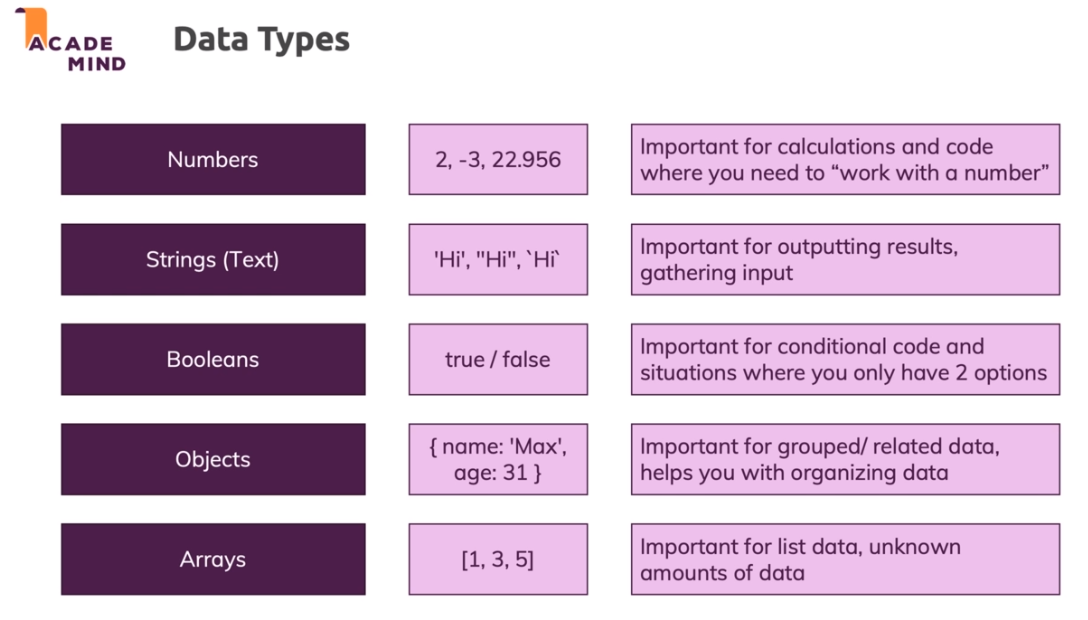
More Core Data Types!
In addition to Numbers and Strings, we have a few more core data types. Booleans, Objects, and Arrays are the remaining core data types.
Using Arrays
Arrays can be used as an internal log of sorts, a list that we can add things to and keep track of things. To initialize an Array, first initialize a variable. This variable can be left undefined at first or set to an empty array []. In order to add values to an array we can use a function that is globally available. One such function is .push(). So this can be added inside of a function like so.
When using console.log, and a single array value is needed, the index can be called. Array indexes start at 0. So the third entry in any array will be [2].
Creating Objects
To create an object, use the {} syntax. In objects, we use key value pairs, these key value pairs can look something like... const thisObject = {operation: "Add"}, we can use variables or strings or numbers as key value pairs.
Objects - Common Syntax Gotchas
You learned the correct syntax for creating an object in the last lecture:
A couple of important things:
You use {} to "group the data" - a semicolon (;) is used after the closing }. On functions, we didn't do that. As a rule of thumb, you can keep in mind that a semicolon is used after {} if the {} are on the right side of the equal sign!
key-value pairs are separated via a comma (,), NOT via a semicolon. Using a semicolon inside of an object (i.e. between {}), would be a syntax error!
Values are assigned to keys/ properties via a colon (:), NOT via an equal sign (=). Using an equal sign inside of an object (i.e. between {}), would be a syntax error!
I.e. this would be WRONG and would throw an error:
Accessing Object Data
How can an object key value pair be accessed? This is accomplished with a simple dot notation.
Adding a Re-Usable Function That Uses Objects
Instead of writing a new object every time we click on a button, writing a function with parameters would make a lot more sense. The parameters are then called in the function body, which is an object, and we just change the operation identifier.
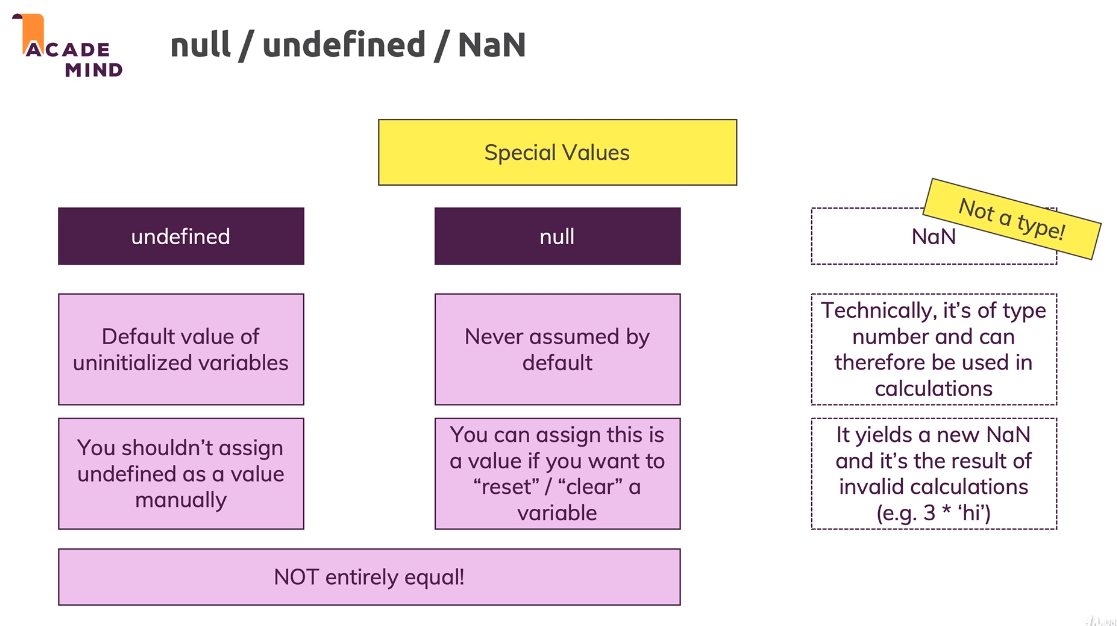
undefined, null, & NaN
The "typeof" Operator
The typeof keyword lets you evaluate the type of the variable at runtime.
Importing Scripts Correctly with "defer" & "async"
In order to optimize script loading and executing there are a few attributes and methods to optimize the process.
Typically, the script will load and execute before the page is finished loading, but what if we wanted the script to execute when the HTML had all finished loading? To do this we would add our script to the head of the HTML page and add the defer attribute to it. This tells the browser to execute the script after the HTML is all finished loading.
The other method is to use async, this tells the browser that the script doesn't rely on the HTML and to execute it as soon as it's finished downloading.
The best method is to put scripts in the head of our page and to add the defer attribute.

Wrap Up
In this module, we covered variables and constants with let and const, operators like = + -, functions, how to manage data and pass data into functions with parameters, how to write proper code syntax, how to work with numbers and strings, how to work with objects and arrays, and how to import scripts properly.
Useful Resources & Links
Efficient Development & Debugging
Module Introduction
This module will be focused on finding, fixing, and avoiding errors.
Efficient Development & Debugging - An Overview
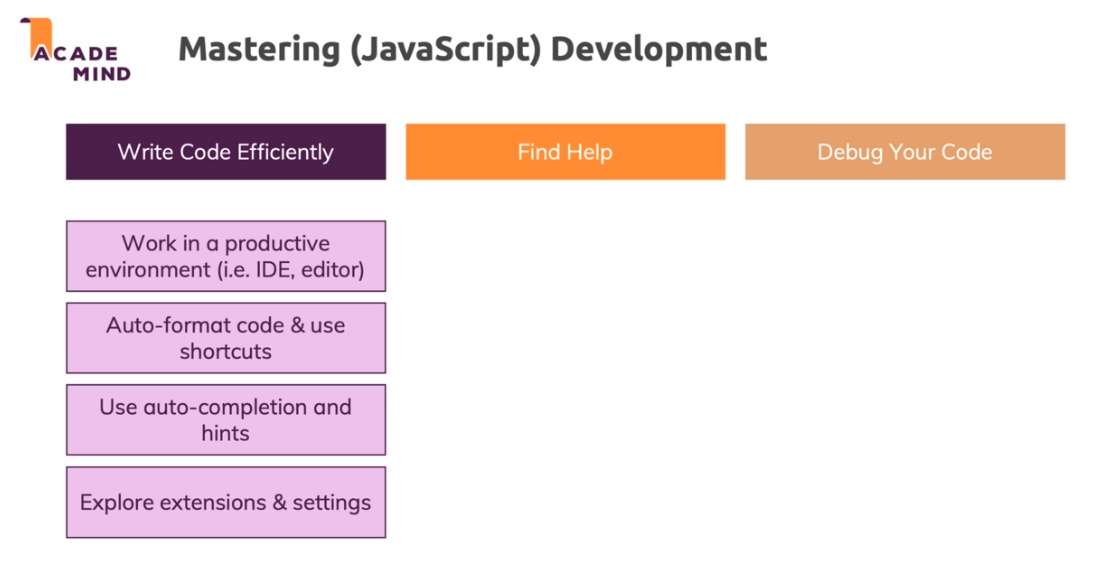
Configuring the IDE Look & Feel
To change the way things look in Visual Studio Code, simply change around the settings in the preferences menu to your liking.
To access some customization menus in VSCode, press ctrl + shift + p.
Using Shortcuts
There are many shortcuts available in VSCode that can help you maximize productivity.
Working with Auto-Completion & IDE Hints
When writing code, Visual Studio Code will often suggest autocomplete options based on what you have typed so far. If the autocomplete tab happens to disappear, you can bring it back into view by pressing ctrl + space.
Installing IDE Extensions
Many modern editors allow you to install helpful extensions. In Visual Studio Code, the extension shortcut can be found on the left sidebar.
It's important to not install too many extensions otherwise the editor will become slow and confusing.
Tweaking Editor Settings
When changing settings, there are 2 options. Workspace and User settings. If workspace settings are changed, they will only be changed for the project that is currently open. User settings change settings for all of the projects that will open in the future.
Utilizing Different IDE Views
On the left side of the editor, there are many helpful tabs, including the search tab. This will search through all of your files and highlight or replace all the matching options. There's also a Git User Interface that's helpful for visualizing your Git commits.
Finding Help & Working with MDN
MDN, or Mozilla Developer Network, is kind of the standard documentation of the web. MDN often includes code examples, syntax specifications, browser support, and many other helpful things. Instead of searching on their site, try Googling something like mdn parseInt, and see what comes up.
The ECMAScript Standard
ECMAScript (the language "behind" JavaScript) is under active development and the current progress and active standard is of course documented.
You find a link on this page: ECMAScript Standards
Please note: This document is absolutely NOT meant to be learned by heart or to be used as a developer. Rather it's important to browser vendors.
Still, if you're interested in getting a glimpse behind the scenes, this document might be interesting.
How to "Google" Correctly
What if we forget what a specific method is called and we need to Google it? Googling something like "JavaScript convert string to number" might help us. Instead of using full sentences, try using keywords.
Debugging JavaScript - An Overview

An Error Message! No Reason to Panic!
For a lot of simple errors, our IDE will tell us what is wrong, but sometimes with invalid functions or something the IDE doesn't know if we've written a specific function or not. These kind of problems are usually caught in the Chrome Dev Tools however.
Using console.log() to Look "Into the Code"
What if there's a logical error in our code but not a syntax error? If it was a syntax error then the IDE would help us, but how do we find logical errors?
We can use console.log() to log out variables or find flaws in the flow of our code.
Next-Level Debugging with the Chrome Devtools & Breakpoints
By placing breakpoints in your code, you can see what is happening in the code at a certain time or place. To place a breakpoint in Chrome Dev Tools, go into sources and select the file you want to evaluate. From there, click on the number of the line of code you want to set a breakpoint on and start the debugger. We can also run through our code step by step and see the scope of variables in a function and determine whether they are local variables or global variables.
Another useful thing we can do is add conditional breakpoints, and add event listener breakpoints for almost anything, example... clicks.
Testing Code Changes Directly in the Dev Tools
If we identify a problem, we can change the code directly from the dev tools, but these changes won't be in the file system, they are purely on the browser dev tools.
Debugging Code directly Inside VSCode
If you want to debug in VSCode as opposed to the Chrome Dev Tools, there is an extension to help with that. Make sure the chrome debugger extension is installed and then click the debug tab and select start debugging. This will create a launch.json file that contains settings on where to launch the development server. The experience is almost the same as in Chrome, with breakpoints, stepping in and out, etc... available to us.
Wrap Up
We learned about MDN, how to debug in Chrome and VSCode, and how to use editor settings and extensions.
Useful Resources & Links
Working with Control Structures (if Statements, Loops, Error Handling)
Module Introduction
We'll be looking at:
- Conditional Statements (if statements) & Expressions
- Boolean Values & Operators
- Loops in JavaScript
- Error Handling
Introducing "if" Statements & Boolean (Comparison) Operators
What if we had a function and there were to options, and we wanted to run one option based on some conditions and another option based on some other conditions? We could use an if statement for this. The if statement takes a condition as a parameter and if that condition is true then it runs the code inside.
We also looked at == vs ===.
Double equals (==) is for something like 2 == "2", so double equals is if they look the same but aren't actually the same.
Triple equals is for if the values are actually the same type, so the example above would be false. 2 === 2
Using Booleans in Conditions & More on Text Comparisons
Understanding the "Condition"
Always keep in mind that condition in
if (condition) { ... }
simply has to be a boolean value.
Often, you'll generate such a boolean value with the help of ===, >, < etc. All these operators yield boolean values (without changing the variables/ values you're using them on).
Since if only wants a boolean, you of course don't have to use such an operator. If you already got a variable that holds a boolean, you can use it without any extra operator.
Example:
You could write
but that would be redundant. You'd generate another new boolean where you already got one.
You can use the ! operator to negate ("invert") the value:
Again, that would be similar to:
But again, that would be redundant.
More on Text (String) Comparisons
Strings can also be compared with greater than (>) or lower/ smaller than (<) operators.
JavaScript compares strings based on standard lexicographical ordering, using Unicode values.
That means that b is greater than a for example.
JavaScript always looks at the first character and only considers other characters if the first character is similar. In addition, capital characters are considered to be smaller than lowercase characters.
See these examples:
Using "if" Statements
The if and else statements are very useful for determining if we should run a piece of code. Inside of the if statement, we pass something into the parenthesis as our true or false statement and if that argument is true the code inside the parenthesis will run.
Working with "if", "else", and "else-if"
What if we wanted to have more than 2 cases in our if statements? This is where the else if statement comes in. We can put else if after our original if statement and use as many else if statements if we need to give us more options.
Beware When Comparing Objects & Arrays for Equality!
If we have 2 objects stored in different variables, and if they look exactly the same, we would assume that they are equal to each other. But, even if they look identical, they are not the same value when we compare with == or ===.
The Logical AND and OR Operators
What if we had multiple conditions that we needed to meet for something to be true? Maybe something like name === max, age === 30, and isAdmin. How would we determine if all 3 are met?
We can use the AND operator &&. The AND operator will only be true if both sides of it are true.
Or, we can use the OR operator ||. The OR operator will be true if at least one side is true.
Understanding Operator Precedence
Beyond true/false: "Truthy" and "Falsy" Values
JavaScript tries to coerce values to a Boolean value if a Boolean is required!
So if we had some code,
Both of these are true, even though we didn't give anything for the second piece to compare to. This is because JavaScript forces the string into a truthy or falsy value.
0 is treated as falsy but any other number, even negative numbers, will be truthy.
To see if something is being treated as truthy or falsy, just write a simple if statement.
if(value) {console.log("True")}
Coercion vs Conversion
It's important to understand that JavaScript is able to use variables in conditions - even without comparison operators.
This is kind of obvious, if we consider a boolean variable, for example:
Since if just wants a condition that returns true or false, it makes sense that you can just provide a boolean variable or value and it works - without the extra comparison (if (isLoggedIn === true) - that would also work but is redundant).
Whilst the above example makes sense, it can be confusing when you encounter code like this for the first time:
JavaScript tries to coerce ("convert without really converting") the values you pass to if (or other places where conditions are required) to boolean values. That means that it tries to interpret 'Max' as a boolean - and there it follows the rules outlined in the previous lecture (e.g. 0 is treated as false, all other numbers are treated as true etc.)
It's important to understand that JavaScript doesn't really convert the value though.
userInput still holds 'Max' after being used in a condition like shown above - it's not converted to a boolean. That would be horrible because you'd invisibly lose the values stored in your variables.
Instead,
And here, the === operator generates and returns a boolean. It also doesn't touch the variable you're comparing - userInput stays a string. But it generates a new boolean which is temporarily used in the comparison.
And that's exactly what JavaScript automatically does when it finds something like this:
if (userInput) { ... }
Setting Up a Bigger Example Project (The "Monster Killer")
We're going to be setting up a monster killer game. This game features player health as well as monster health, and things like a regular attack, strong attack, healing, and a display log option.
Adding an "Attack" Function
In this module we set up a function that attacks the monster. For this, we used some random math and an event listener to run a function when we click on the attack button.
Using "if" Statements for Checking the Win-Condition
In this module we set up if statements to check the monster health and the player health and determine if it was going to be a win, a loss, or a draw.
Adding More "if" Statements & A "Strong Attack" Functionality
We added more if statements to our "monster hunter game". Not fully following along.
Time for a "Heal Player" Functionality!
We made it so that the heal functionality doesn't heal for more than our max initial health.
Controlling the Conditional Bonus Life (Without Boolean Operators!)
We ran an if check to see if we would die && if we have a bonus life. In the case that we have a bonus life it will take away the most recent attack and let us either heal up or attack again.
Adding a "Reset Game" Functionality
Inside of all of our if checks, we can put a reset function inside that will run if we have won, lost, or drawn.
Validating User Input
In a prompt, we let a user input a number which will be the max life value for the monster and for us. To make sure we get a valid number, we use toInteger, and we also use isNaN.
Utilizing Global Constants as Identifiers in Conditional Code
If we want to use a string identifier as something like a parameter in a function, it is very easy to mistype the string and crash our function. To avoid having these kind of typos, we can use something like const STRONG_ATTACK = "ATTACK" and this will help us with autocomplete.
Adding a Conditional Battle Log
We added a writeToLog() function that calls event and value as parameters and checks some if statements to see what it should print.
We added an object containing updated values for each option that we could log into the battle log function. Then, we can loop through each of them with if statements and once we find the one we need it will update what we need.
Currently, all of our data is dumped into the console in an array so we can have a large number of arrays, say 30, based on what the gameplay looked like.
Introducing the Ternary Operator
The ternary operator is a helpful way to write inline if statements that will save some space and provide a simple return value with 2 options based on the variable we provide.
A Bit of Theory: Statements vs Expressions
An expression is something that yields a value that you can store in a variable.
A statement is something that can't be used as an argument.
Logical Operator "Tricks" & Shorthands
!! Boolean Coercion via double NOT operator. This will give us the actual value, because just 1 ! will return the opposite of whatever we're evaluating.
|| Default value assignment via OR operator. Only one value needs to be true to return true for the whole OR evaluation.
&& Use value if condition is true via AND operator. All sides need to be true for the AND expression to evaluate to true.
Logical Operators - A Quick Summary
As a reference which you can come back to (or print out), here's a quick summary of how logical operators and comparison operators behave in JavaScript:
Always keep in mind: NO operator (neither ===, > etc. nor && or ||) changes the variable you might be using in the comparison. In the above examples, the values stored in userName and altName are NEVER changed.
===, > etc. just generate new boolean values which are used in the comparison. || and && generate NO booleans, they just treat the values before and after them as conditions (which therefore need to yield boolean values and are coerced to booleans if required).
Because of the above-described behaviors, you often use || in JavaScript to assign default/ fallback values to variables/ constants:
Working with the "switch-case" Statement
The switch case is a smaller alternative to the if else if else blocks we write by testing against a single condition.
What's happening is that we're comparing the switch parameter, variable, and seeing if it matches up with the value in case1 or case2 and running the code that follows after depending on whether or not it contains the same value.
When we use the break keyword, it will stop execution of the other cases once it finds the first one that meets the value.
We also have a default case, which is kind of like an else case in the fact that it runs if no other value matches the case.
Behind the scenes, a switch case will always use the === comparison.
Introducing Loops
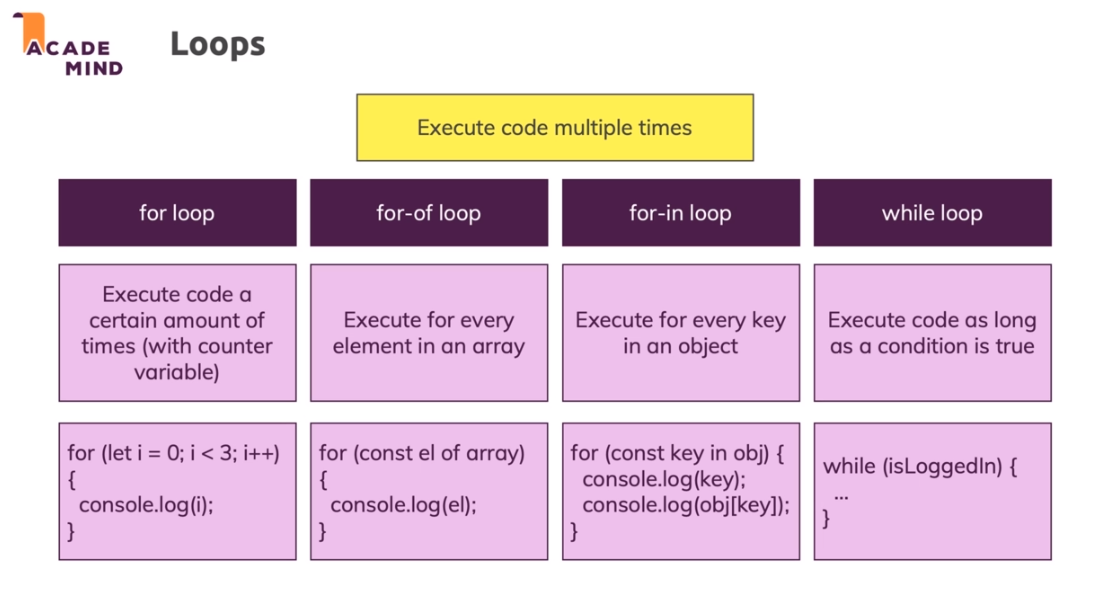
Loops allow us to execute code multiple times. As opposed to calling a function a certain amount of times, loops allow us to have more control over how often we're running this code.
JavaScript has 4 main loops. for, for of, for in, and while.
The "for" Loop
The for loop is the oldest and most commonly found loop in other programming languages.
First, we initialize a index variable, usually i. Then, we have a condition to tell our for loop to run as long as the condition is true. Finally, we have our increment, or something to make sure we don't run an infinite loop.
The "for of" Loop
Instead of using an index loop like i, using for of will give you a brand new variable for every object in the array.
The "for in" Loop
You can have nested loops or nested loops inside of objects.
The "while" & "do while" Loops
The while loop can sometimes be used to replace a for loop.
If we want the code to run before we check whether the condition is true or false, we can use a do while loop.
Assignment 3: Control Structures
We were tasked with using some different for loops and some different logical operators.
Controlling Loops with "break"
break allows us to break out of a function execution after one or more executions of a loop.
Controlling Iterations with "continue"
Using continue instead of break will simply skip the loop iteration on which it was called.
More Control with Labeled Statements
Labeled statements allow us to give a kind of name to nested loops.
The syntax is like nameOfLoop: for(). Then, when we want to either break or continue a specific loop, we can use break/continue nameOfLoop.
Just be careful as to not create an infinite loop.
Error Handling with "try-catch" - An Introduction
Some errors are beyond our control as a developer and such can't be avoided.
Some examples are if a user inputs the wrong type of information in a field, or a network error or a server being offline, etc...
The best thing is to throw and catch errors to fail gracefully or recover if possible.
We can do this with try and catch.
Throwing Custom Errors
We can add a throw statement that looks something like this.
This creates an error message in the console and it stops our script execution.
Working with "try-catch" to Catch & Handle Errors
We might think that it would be a good idea to wrap our entire program into a try statement, but that is bad for performance and bad code behavior. Instead, we should wrap code that we can't control whether or not it fails into a try block.
That's not all we can do with try-catch however, we can add a finally block. We can use finally as a replacement for catch if we desire, but we still need to have our try block. The code inside of finally will always execute whether or not we have an error.
Wrap Up
We learned a lot about boolean statements and loops as well as some error handling + control structures.
Useful Resources & Links
Behind the Scenes & The (Weird) Past (ES3, ES5) & Present (ES6+) of JavaScript
Module Introduction
We'll be looking more behind the scenes of JavaScript and how it works and how it has evolved over time with the different syntax and language changes.
- ES5 vs ES6+ Syntax
- How JavaScript Works
- The Weird Parts
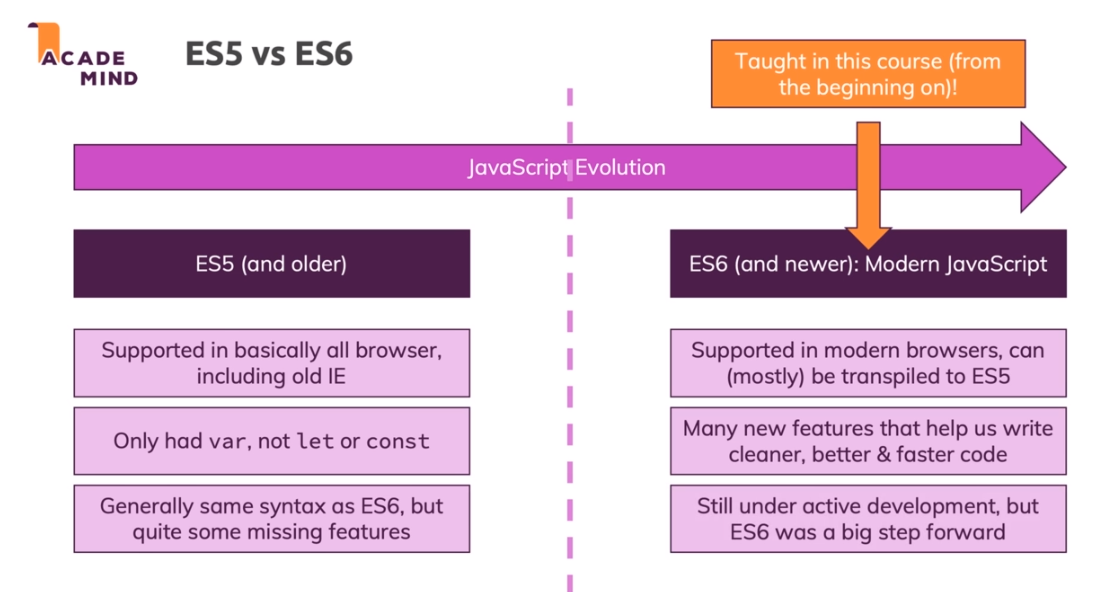
ES5 vs ES6+ ("Next Gen JS") - Evolution of JavaScript
ECMAScript is the committee behind the JavaScript language and they decide the technical aspects of how JavaScript works.
ES5 and older is considered the older version of JavaScript and ES6 and newer is considered to be modern JavaScript.
var vs let & const - Introducing "Block Scope"
What are some of the differences between let, var, and const? let and var both create a variable, const creates a constant. var has been available forever, but let and const have only been available since ES6. var is available in the function and global scope but let and const are only available in block scope.
If you create variables with let or const inside of curly braces, such as a function or object, that is where those variables will live and they will not be accessible outside of that block scope.
Understanding "Hoisting"
If we try and call a variable before it is initialized, it will either give us undefined, or error.
This is because of "hoisting", which is what the browser does when it pulls all of our variables up to the top of the page.
It is always best practice to declare variables before calling them, usually at the top of the script.
Strict Mode & Writing Good Code
"strict mode" will disallow many of the things JavaScript allows you to do that probably shouldn't be done. One such feature is that is disallows you to initialize and access variables if you forgot the let or var keyword.
To enable strict mode, just add a string to your script or function that will say "use strict".
How Code is Parsed & Compiled
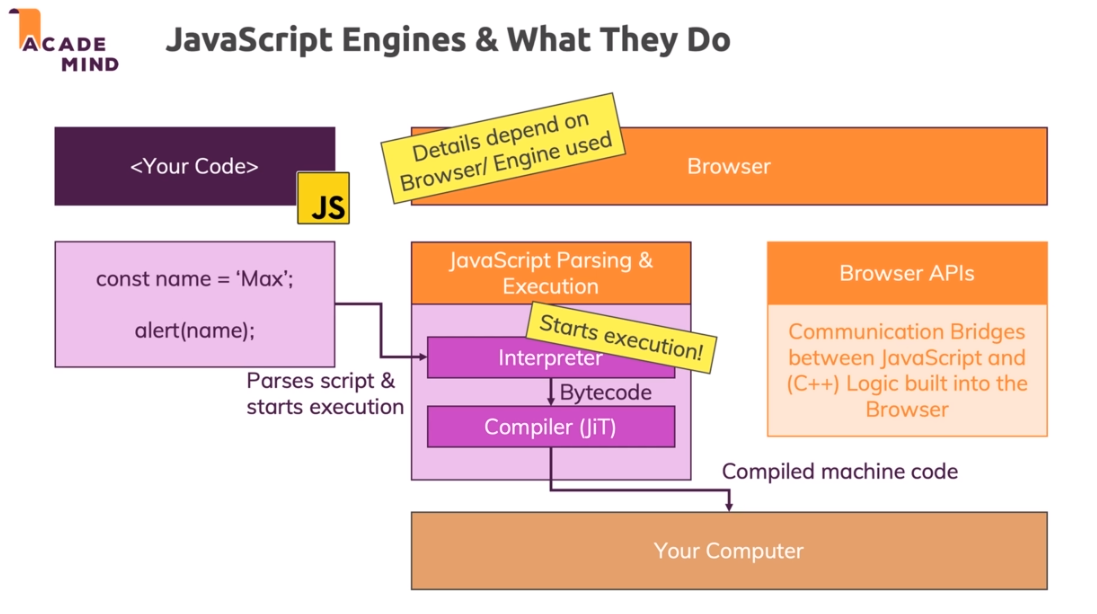
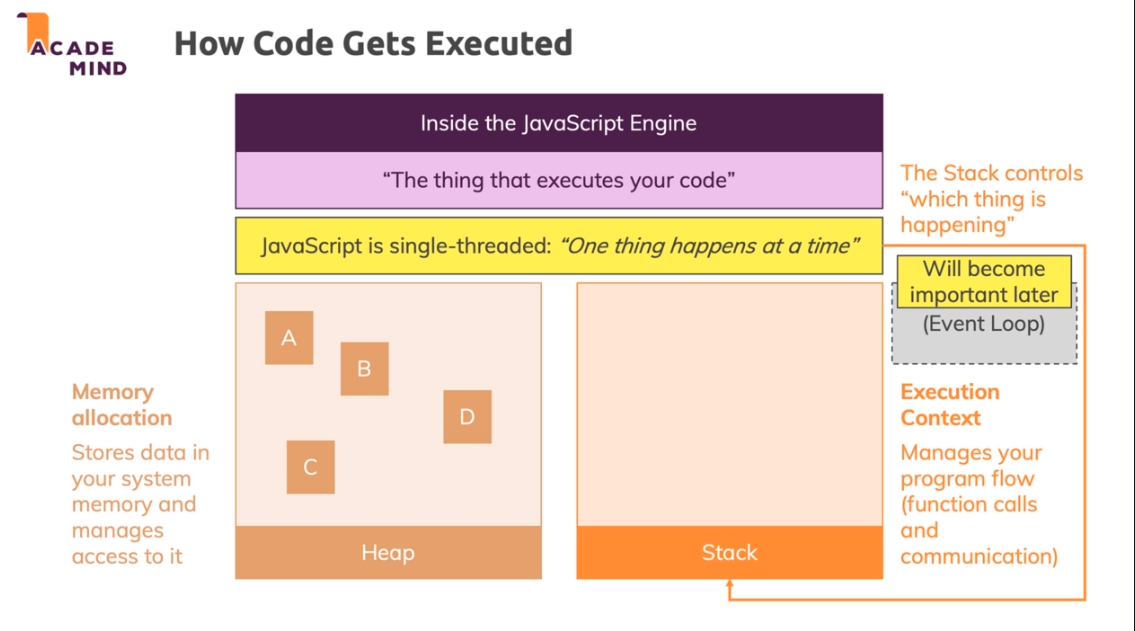
Inside the JavaScript Engine - How the Code Executes
JavaScript will add our functions to a call stack and go through each item in a stack and then when the function is done running the item is taken off of the stack.
JavaScript Language vs Browser APIs
The JavaScript language differs from the browser APIs and DOM that we might use for web development. The core language is developed by the ECMAScript foundation and browser vendors implement their own browser APIs.
Primitive vs Reference Values
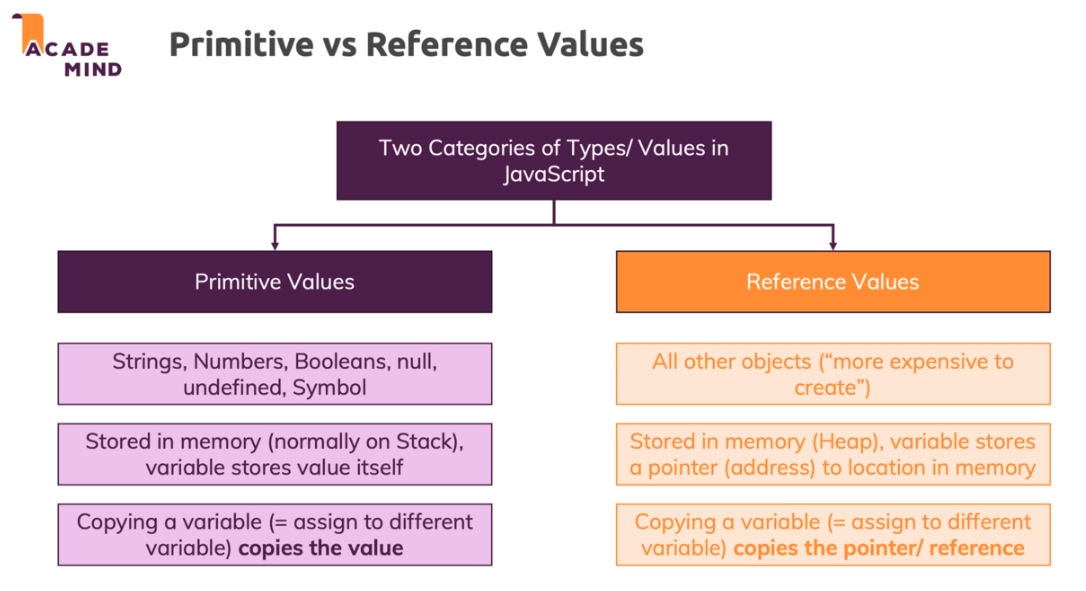
In JavaScript we have 2 categories of types/values. We have primitive values and we have reference values.
Primitive Values: Stored in memory (normally on Stack), variable stores value itself
- Strings
- Numbers
- Booleans
- null
- undefined
- Symbol
- Copying a variable copies the value
Reference Values: All other objects ("more expensive to create")
- All other objects
- Variable stores a pointer (address) to location in memory
- Copying a variable copies the pointer / reference
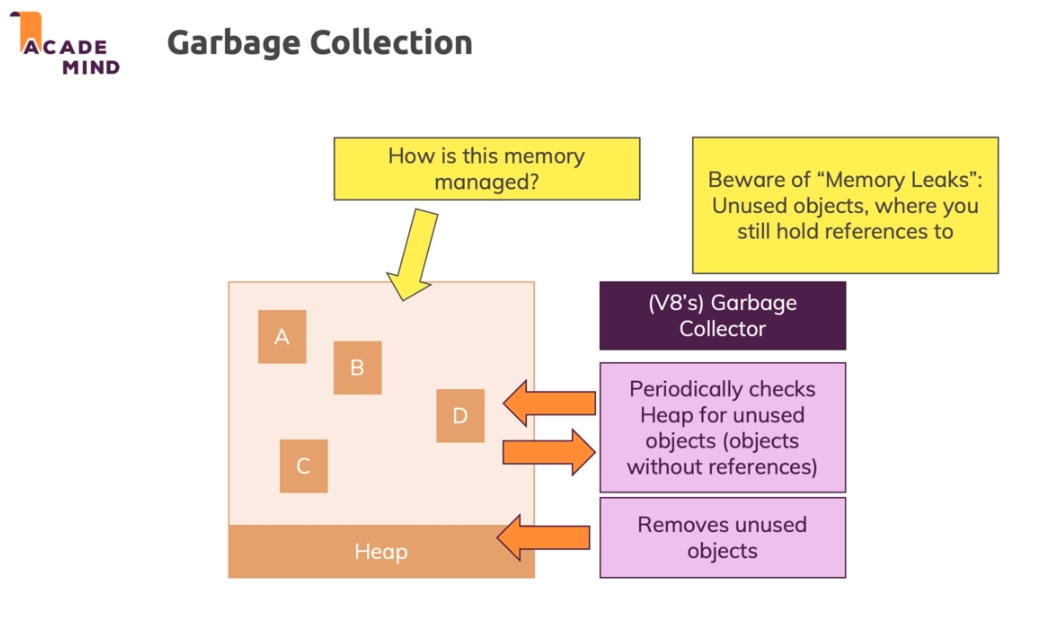
Garbage Collection & Memory Management
When we write our objects and then don't assign them to anything or if we have them equal to null, V8's garbage collection will remove that object so that it doesn't take up excessive space.
Useful Resources & Links
More on Functions
Module Introduction
Beyond function basic() {}
Module Content:
- Different ways of creating functions
- Anonymous functions
- Callback functions & functions in functions
- Default arguments & rest operator
- bind() & more
Recapping Functions Knowledge - What We Know so Far
What We Already Know:
- Functions are "Code on Demand"
- Variables and constants created in functions "belong" to that function
- Functions can take parameters (arguments) and can return a value
- Functions can be called multiple times (with different arguments)
- Functions can be called "directly" and "indirectly"
Parameters vs Arguments
Parameters are the variables you specify when you make the function.
Arguments are the concrete values you pass to a function when calling that function.
Functions vs Methods
Methods allow us to store functions as a key on an object. Then we can call the function that is stored on that object by saying objectName.functionName(argument).
Functions are Objects!
If we have a function, and we console.dir that function, it will return the object of the function with all the properties and scoping and things.
Function Expressions: Storing Functions is Variables
When we store a function in a variable, we no longer have access to calling the original function name, instead, we can call the function by calling the variable we stored it in.
Often we have a variable that points to an anonymous function and then the return value is stored in the variable.
Function Expression vs Function Declarations
A different way of defining functions
In the Function Declaration / Function Statement the function is hoisted to the top and can be declared anywhere in the file (i.e. also after it's used).
In the Function Expression, the function is hoisted to the top but not initialized / defined, can't be declared anywhere in the file (i.e. not after it's used).
Anonymous Functions
Anonymous functions are often created as a part of event listeners or similar cases, and it has no tie to a variable or anything else that is callable.
This is great if our function only needs to be called in one specific situation and don't want to create a variable for it.
Sometimes it is nice if we have the function tied to a variable in the case that we need better error handling. If we have a webpack build that tells us a line number, it might not line up to the line in our actual code whereas if we have a name we can track down the function in our code.
Working on the Project: Adding User Choices to the Game
In this section, we added a function that will ask the user for a prompt and if the user doesn't have a valid choice we automatically select an option for the Rock, Paper, Scissors game.
Implementing the Core Game Logic
In this video, we set up a Math.random() function that will let the computer choose between rock paper or scissors.
We also added some conditional logic to determine who won based on precedence of rock vs paper vs scissors.
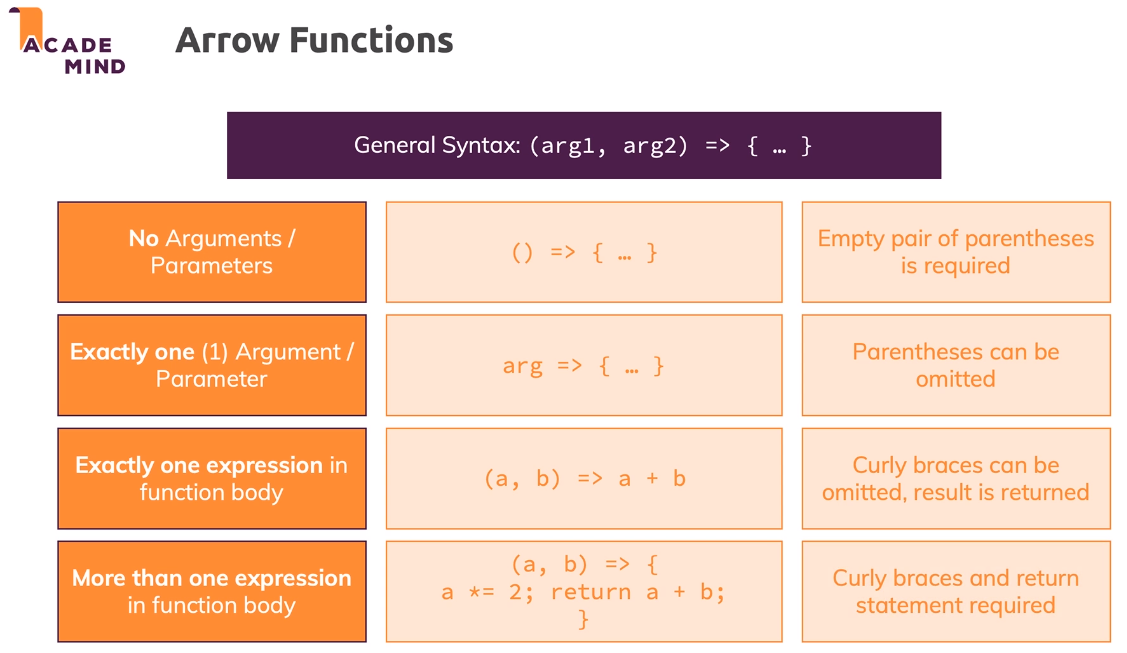
Introducing Arrow Functions
There is another syntax that doesn't even require the function keyword. This is known as an arrow function and an arrow function looks like this.
One little thing we can do with an arrow function is an implicit return. If we only have 1 return value possible, we can omit the curly braces and the return keyword and just leave the arrow, this will tell JS that we just want to return whatever comes next.
Outputting Messages to the User
In this video, we set up a message variable with template literals that will tell the user whether or not they won and all we have to do is call the one message variable and add on the end the result.
Default Arguments in Functions
If we have a parameter and don't give that parameter some value when we're calling the function, we'll be returned with undefined. But, we can set a default value that will allow us to have a fallback option if nothing is set to the argument.
Introducing Rest Parameters ("Rest Operator")
What if we had a function that needs to take in more parameters than we originally thought? or if it's located in a user based loop so we will never know for sure the amount of parameters we might need. Instead of hard coding in large numbers of parameters and letting them either be used or become undefined, we can use rest parameters.
The rest parameter will take all possible arguments we receive and build us an array containing all of the values we received.
The rest parameter must be the last parameter we use because if we have regular parameters after our rest, we will never be able to reach it. We can add other params beforehand.
Another useful thing we have access to is the arguments parameter. This will give us an array like list containing all of the arguments the function took in. This is an alternative to using the rest parameter, but the rest version is more recommended.
Creating Functions Inside of Functions
When we create functions inside of functions, they are tied to that function scope and no longer available in the global scope.
Most of the time, we're going to want to use global functions in case we need to call it in the future.
Understanding Callback Functions
A callback function is a function that we pass into another function, often times as a parameter, and it is called for us. We don't get to control when it's called.
Common examples of callback functions include event listeners. The addEventListener function takes in an event listener to listen for, and a function to execute when the event happens. This is a callback function because it calls our function for us when something happens.
Working with "bind()"
bind() allows us to take a function and bind an object to it so that we can call off of that specific objects values.
bind() can come in handy in situations where you might want to "pre-configure" a functions arguments, when you're not calling the function on your own.
Useful Resources & Links
Working With the DOM (Browser HTML Code) in JavaScript
Module Introduction
We'll be looking at:
- HTML, DOM & JavaScript
- Nodes & Elements
- Querying DOM Nodes & Traversing the DOM
- Evaluating & Manipulating DOM Nodes
- Creating & Removing DOM NOdes
What's the DOM?
The Document Object Model is an API that the browser gives us access to and this DOM allows us to interact with the HTML Document. We also have access to document and window. Document is the root DOM Node and this is what's providing us access to element querying. The window is the active browser tab/ window and it acts as a global storage for scripts and provides access to window-specific properties and methods.
Document and Window Object
The window object is the topmost object available to us. If we call a function like alert on the window object, we don't actually need to use the .window because the browser will automatically add the window object to anything that is a property of window.
Understanding the DOM and How It's Created
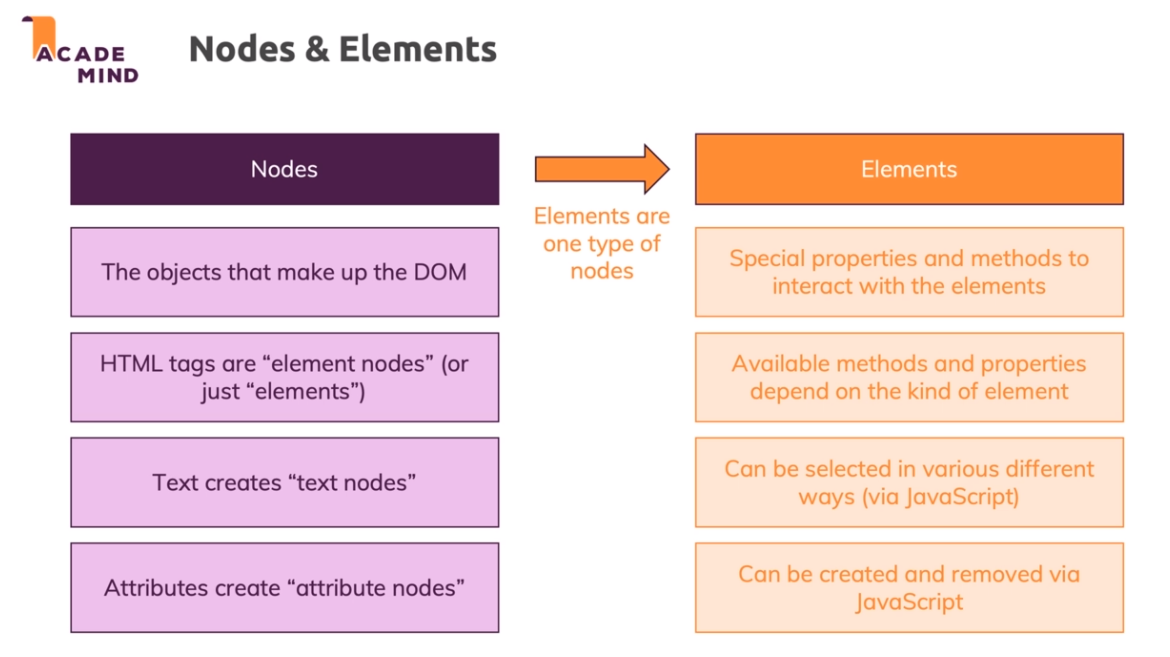
Every HTML page is just text at its core, and the browser doesn't work with just text. Every HTML page is turned into an object containing an information tree containing all the Nodes of our HTML.
We have 2 different types of Nodes in our content. We have Element Nodes and we have Text Nodes.
Nodes & Elements - Querying the DOM Overview
When querying elements, we have options between selecting single elements or groups of elements.
Selecting Elements in the DOM
To select an element, we can use document.getElementById("idName") and it will fetch the first element it finds with that CSS ID on the page.
We can store this reference to our element in a variable for easy manipulation.
We can also use element.getElementById("idName") to search the children of the element we have selected and call the search method on.
document.querySelector() takes in any CSS selector and will return the first matching item unless we run querySelectorAll() which will return a NodeList.
It's important that we import our script correctly so that our HTML will load before the script, if our scrips loads first it won't be able to find the HTML elements that we're referencing. We can either add our script at the end of the HTML body or we can add it in the head with the defer tag attached.
Exploring and Changing DOM Properties
We can store the location of our HTML Element in a variable and then we can access properties like id's and class names and other things that are stored on the elements object.
Attributes vs Properties
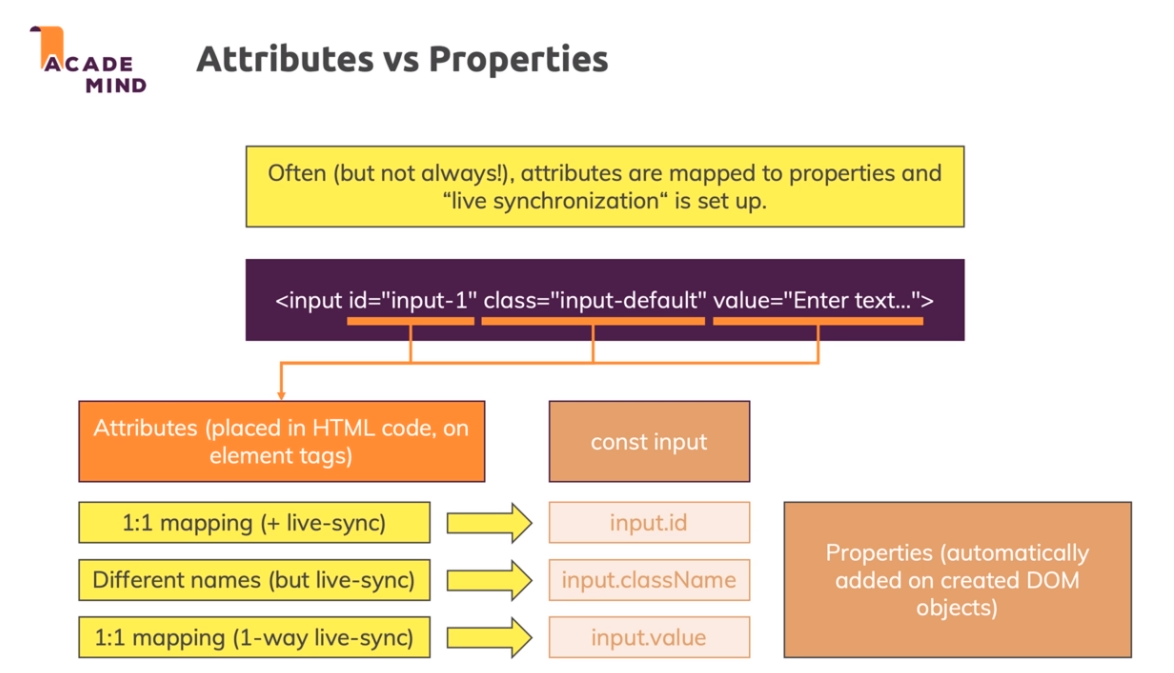
When working with our HTML code inside of JS, we have access to our HTML's attributes and our HTML's properties, but what's the difference? Attributes would be things like
id="input" or value="Enter text". Properties would be things like input.value.
Often (but not always!), attributes are mapped to properties and "live synchronization" is set up.
The different in using properties to update values, is that in the HTML, it won't always be mapped as the original attribute.
A workaround for something like value where it's not live mapped between attribute and value, we can set the value equal to the actual attribute like so...
input.value = input.getAttribute("value");.
Selecting Multiple Elements & Summary
If we use something like document.querySelectorAll() which returns a NodeList, we can use a loop that will give us an index which we can use to select individual items in the NodeList. We can also access with a for of loop or a forEach function.
When working with elements, it's best to store the reference into a variable for easy access.
Traversing the DOM - Overview
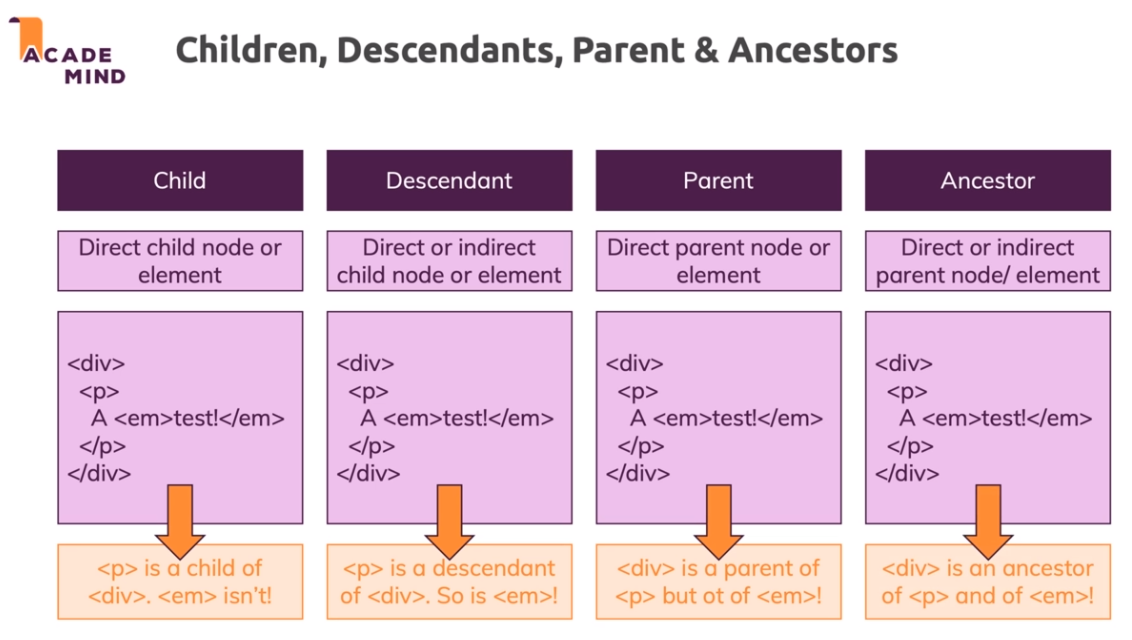
When working with the DOM, we have to understand the differences between child, descendant, parent, and ancestor elements.
Children, Descendants, Parent & Ancestors
We also have a few options for selecting parents or siblings, for example... firstChild, childNodes, nextSibling, and parentElement.
Traversing Child Nodes
Say we have a ul with 3 li's, and we want to access the second child of the ul. To do this, we could first select the ul and then use ul.children to access the list of children and from there we can use index based selecting, [1], to find the second or third child. When we access the child NodeList, we also get access to the Text Nodes of our li's.
If we just want our first child element, we can use firstChild.
Using parentNode & parentElement
When we access an element and call the parent on it, it will only return one element or one node. This is because there can only be 1 parent element / node, as opposed to a NodeList of child elements.
Selecting Sibling Elements
If we have an li and we want to go out of the li past the ul/ol and into the page header, we can use previousElementSibling. This will return an element as opposed to a text node which will contain whitespace and it not exactly what we're looking for.
DOM Traversal vs Query Methods
When we have an li, it is almost always contained inside of a ul/ol. Other elements often change positions when we add things to our HTML. So in the cases where we know things won't change it can be a good idea to use DOM Traversal methods to locate elements, but in cases where things could change it would be a better idea to simply use something like querySelector.
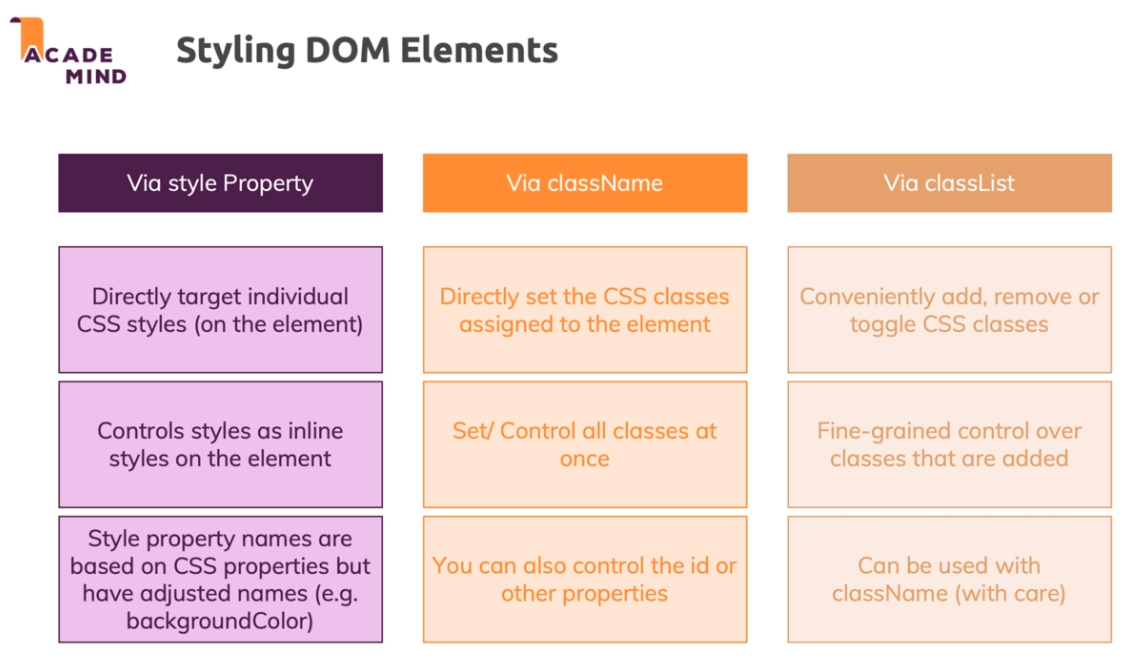
Styling DOM Elements
When we want to style our selected elements, we have a few options. We can use the .style, which is similar to adding inline styles and will take the #1 precedence in CSS, or by using the className / classList.
When using className, we would have to set a string containing a list of all our class names and we would have to update the string if we needed new classes. A much nicer alternative is classList. On classList, we have add, remove, and toggle. All we have to do is pass in our class name as a parameter and whether we're trying to add remove or toggle.
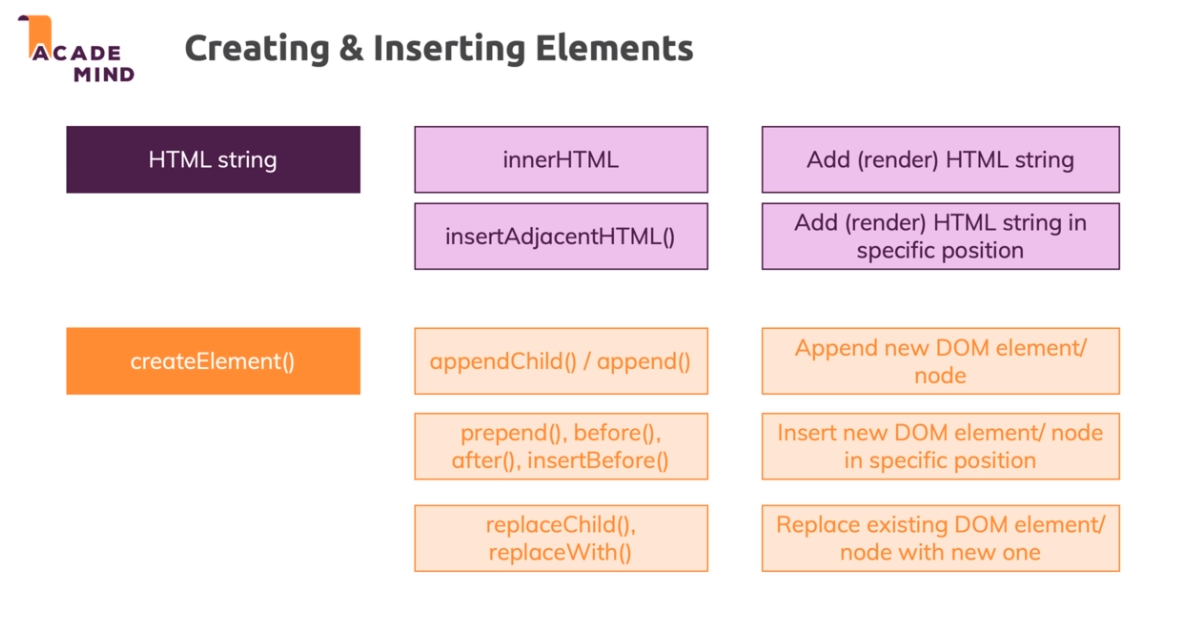
Creating Elements with JS - Overview
When we want to add elements to our page using JS, we have 2 options. We can either use an HTML string, such as innerHTML, or createElement().
Creating and Inserting Elements
Adding Elements via HTML in Code
When we select an element in the DOM, we have access to its innerHTML. innerHTML is a string that we can use to construct HTML, we can pass in tags and data and it will be rendered entirely as HTML. This will replace whatever we had as our previous markup.
If we are just trying to change one thing and don't want a full page refresh, we should avoid innerHTML as it causes everything inside the element to refresh.
We can also use insertAdjacentHTML() to select an element and then insert HTML in one of four locations.
Adding Elements via createElement()
We might not want to use insertAdjacentHTML() and the reason has nothing to do with performance or user experience, instead it is our own developer experience. When we create an element using insertAdjacentHTML, we have no way of directly accessing the element we just created without running a query.
This is where createElement comes in. This allows us to create any new element and we can store the location in a variable upon creation. We always call this method on the document object, like document.createElement().
createElement will take at least 1 argument, being the tag name. But we need to store our new element in a variable otherwise it will get lost in the void and be garbage collected because we have no reference to it. Once we have a variable assigned, we have to actually add it to the DOM. We could do something like body.appendChild(ourElement).
Inserting DOM Elements
appendis a method that we call on the parent element and it allows us to directly append our new element to the element that we're calling it on. This method can also take more than one element in its arguments.prependis a method called on a parent element and it will add the new element as the first element (first element on whatever we call it on)lastElementChild .before .afteris a method that allows us to select the last element in an element and insert our element either before or after the selected element.firstElementChild .replaceWith()is a method that allows us to replace a selected element with another element of our choosing.element.insertAdjacentElement()allows us to select an element and insert our element adjacent to the selected element.
Cloning DOM Nodes
When we insert an element and then insert that same element somewhere else by using a different DOM Insertion technique, the element is not inserted in both places, it is moved to the most recent location. If we want to clone our element and place it in again somewhere, we can use cloneNode(true).
Live Node Lists vs Static Node Lists
If we have a ul and we query our ul with querySelectorAll() and we also query it with getElementsByTagName() we get 2 different functionalities.
querySelectorAll() will return a static node list.
getElementsByTagName() will return a live node list.
If we were to append a new element onto our ul, and then console.log our variables that contain the node lists, we would see that the static node list still only contains the original li's, but our live node list will contain whatever we just added in.
Removing Elements
The simplest way to remove an element is to call the remove function on it.
The remove method is not supported in Internet Explorer however, so if we need to support farther back we can call a function called removeChild on a parent element.
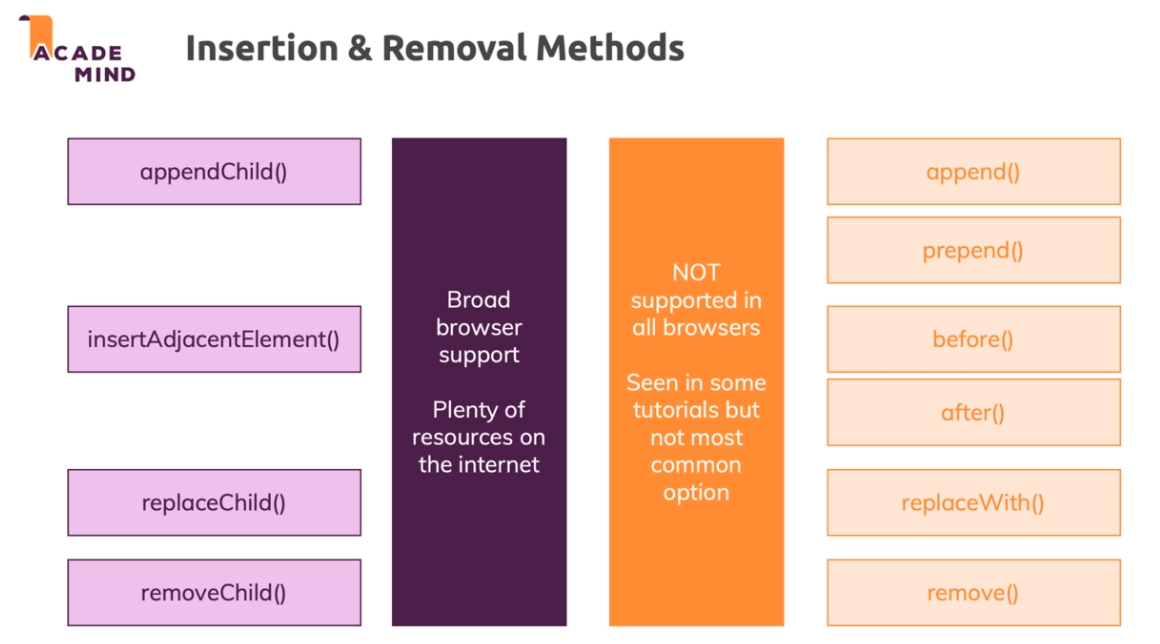
Insertion & Removal Method Summary
Summary: Insert, Replace, Remove
Create & Insert:
innerHTML- Creating and inserting DOM objects manually
Insertion Methods:
append()appendChild()prepend()insertBefore()before()after()insertBefore()insertAdjacentElement()element.cloneNode(true)
Replace:
replaceWith()replaceChild()
Remove:
element.innerHTML = ""- element.remove()`
element.parentNode.removeChild(element)
Text Nodes:
textContentinnerText
Setting up the Practice Project
This project is a personal movie database where we can open a modal and add a favorite with a title or image, and we can remove a movie by clicking on it.
Selecting the Modal and "Add" Button
In this video, we selected our modal div and added a click listener. Inside our click listener for the modal div we set up a classList function to add a visible class to the modal so that it switches from display none to display block.
Opening a Modal by Changing CSS Classes
First we need to add an event listener to the button and then we can use classList.toggle to determine whether or not to make the modal visible.
Once our modal is selected and opened, we can add a backdrop that will turn the background a darker color and make it so that you can only click on the open modal.
Controlling the Backdrop
To add our backdrop we can add an event listener on the add movie button and then once we have it up we can add an event listener to the backdrop so that if we click outside the modal will close.
Fetching and Validating User Input
In this video, we got the user input and ran some simple validation to determine if the numbers were valid. We used .trim to ensure that there was no invalid whitespace.
Creating a Move in JavaScript & Clearing the Input
Once we have our movie added through the input modal, we need to be able to clear the user inputs as well as store the data the user entered into an object.
Rendering Movie Items on the Screen
To render our new movie to the screen, we created a new function that will take in the movie's title, image, and rating. From there we call a function that will create some new elements and add the data that we received from the user input into the new movie modal. We also used innerHTML to construct an interpolated string containing the data the user inputted.
Deleting Movie Elements
To delete an item, we get the index of the movie that we're trying to delete and we use splice to remove the item with our selected index and move the other items up.
Showing & Hiding the "Are you sure?" Dialog
To show and hide the confirmation dialog, we simply add event listeners to the backdrop and then toggle the show or hide modals using functions.
Starting with the Confirmation Logic
In this video, we added some confirmation logic so that when a user clicks the delete movie button, we can verify that they are sure they want to continue.
Finishing the App
To finish up our Movie App, we did some bug fixes for the backdrop toggling as well as the cancel button not clearing the inputs.
Wrap Up
We learned about attributes vs properties and event listeners and function chaining.
More on Arrays & Iterables
Module Introduction
Module Content:
- Different ways of creating arrays
- Working with arrays, a deep dive
- Important array methods
- Other iterables: Maps & Sets
What are "Iterables" and "Array-like Objects"
An Iterable:
Technical Definition: Objects that implement the "iterable" protocol and have an @@iterator method (i.e. Symbol.iterator).
Human Definition: Objects where you can use the for-of loop.
Not every iterable is an array! Other iterables are (for example): NodeList, String, Map, Set
Array-like Objects:
Technical Definition: Objects that have a length property and use indexes to access items.
Human Definition: See technical explanation.
Creating Arrays
We have a few options for creating arrays.
Which Data Can You Store in Arrays?
We can store any form of data inside of our array as well as nested arrays or nested objects or a nested combination of both.
push(), pop(), unshift(), shift() - Adding & Removing Elements
push adds elements to the end of an array.
unshift adds elements to the beginning of an array.
pop removes the last element of the array.
shift removes the first element of the array.
push and pop are faster than shift and unshift because all they have to do is add something to the end whereas the other methods will have to move everything in the array one place to the right so that our new element can be in front.
If we try and push an element to an index number that does not exist yet, it will return as undefined.
The splice() Method
If we have an array that contains ["Sports", "Cooking"] and we want to insert something in-between sports and cooking we can use splice().
splice() takes in 3 arguments. The first is the index which we are going to be starting with (including the number you input), the second is how many items we want to delete, and the third is what item we're going to be adding in the index we specified.
We can store the elements that were removed from our array by using splice. All we have to do is store them in a variable like so... const removedElements = hobbies.splice(1, 0, "Good Food");.
If we specify our index as -1, splice will start at the last element and move to the left.
Selecting Ranges & Creating Copies with slice()
slice is a great way to copy an array because it will return whatever we have sliced.
We can also specify a start(included) and end(not included) array indexes from which to slice.
Adding Arrays to Arrays with concat()
concat is great for copying arrays because it will copy whatever we tell it to and then it will return a new array to us. We can also pass in additional items that will be added to the copy upon creation.
Retrieving Indexes with indexOf() and lastIndexOf()
indexOf allows us to search our array for a specific number and we can specify which index to start from. If it finds the element, it will return the index, otherwise if there is no element it will return -1. It will stop at the first matching value and will not return all the indexes of all the values that may match the criteria. indexOf won't work with objects.
lastIndexOf will start from the right of the array.
Finding Stuff: find() and findIndex()
indexOf doesn't allow us to find things inside of objects, so how do we find inside of objects?
find can help us find things. It takes a function as an argument and inside the anonymous function is up to 3 arguments.
findIndex will do the same thing as find, it will just return the index of the item instead of the actual item.
Is it Included?
includes is good to quickly check if a value is part of an array.
This is good if you don't care about finding the index and just want to see if the array contains the value anywhere inside.
Alternative to for Loops: The forEach() Method
forEach() allows us to loop over an array and run a function for each element in the array. We are given 3 arguments, the first is the current element that we're working with, the second is the index, and the third is if we want access to the full array.
Transforming Data with map()
map() allows us to loop over each element similar to how forEach() works but map will return a brand new element for each object that it loops over.
sort() and reverse()
sort by default will convert everything to a string and sort in ascending order. If we want to be more specific with our sorting we can pass in our own sorting function.
reverse takes no arguments and simply reverses our array and returns it.
Filtering Arrays with filter()
If we want to reduce the amount of elements in our array based on a particular filter we can use filter. Filter takes a function and that function takes a few parameters, the value, index, and original array. Then we return a new array that contains all the data that passed through our filter.
Where Arrow Functions Shine
Arrow functions can definitely help us when we're trying to shorten the length of our code. If we take the function above and turn it into a shortened arrow function with an implicit return we can save 2 lines.
The Important reduce() Method
If we want to take an array full of numbers and add up and return the sum, we could do that with either a for loop or a forEach method. But we can also use reduce to do the same thing. Reduce is very powerful and takes 4 parameters as well as a second function which is the default value for prevValue when we start it for the first time.
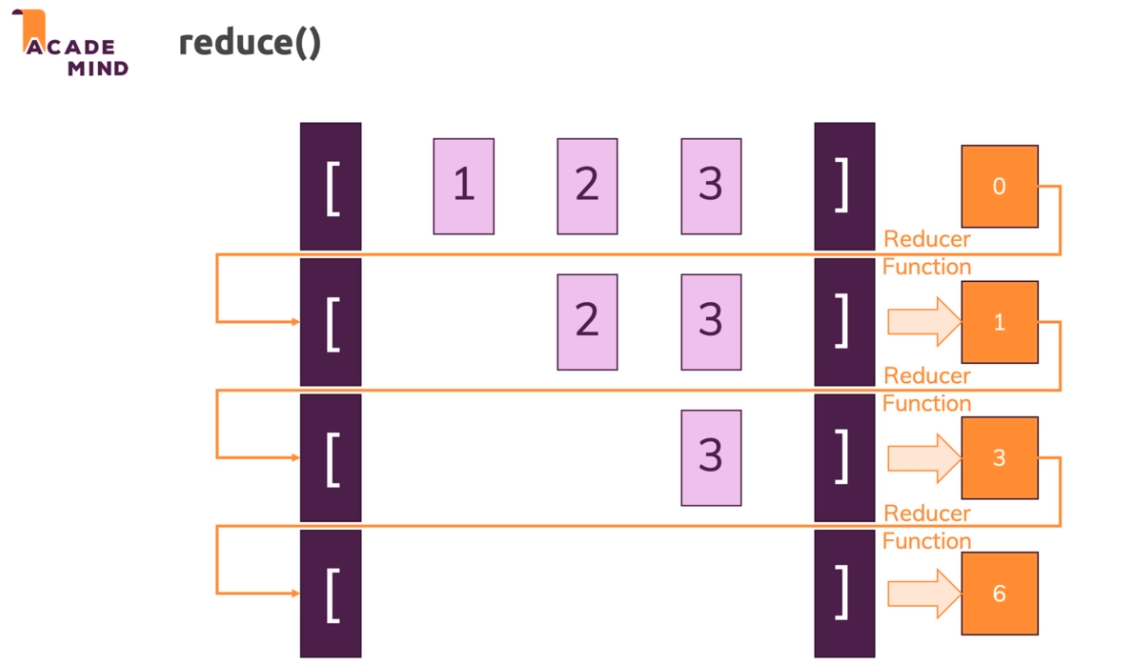
Arrays & Strings - split() and join()
split will take a string and split it into an array based on what you split on. If you split on "" it will put every letter in its own array index.
join allows us to take 2 strings from our array and join them together into one string. We can pass a separator as an argument to join.