The New Modern JavaScript Bootcamp - Colt Steele
Introduction
How This Course Works
There are 2 distinct parts. The first part is a start to finish intro to JavaScript for absolute beginners. The second part is focused exclusively on projects, including some projects with node, express, MongoDB, etc...
If you run into trouble during the projects section of the course, just come back to the first half and rewatch the learning videos.
JS, ECMA, TC39: What Do They Mean?
ECMA is simply an organization that defines many standards for technologies. ECMAScript is not a language, it is simply a language specification, saying things like the language should do this, have this functionality, use this feature, etc...
The way the naming system used to work is like ES6, and features were released every few years, but now it is updated yearly. Although the naming system is a bit off, for example ES6 refers to ES2015. This is why we need websites like CanIUse
The Tools You Need
Web Browser: Chrome
Text Editor: Visual Studio Code
Customizing VSCode & Extensions
A Quick Note About MDN
Because JavaScript is constantly changing and there are so many different versions, we don't have any official documentation for the language. MDN (Mozilla Developer Network) provides a great resource for language documentation for JavaScript and other web questions you might have.
JS Values & Variables
Goals & Primitives
Goals:
- Work with primitive types
- Understand
letandconst - Use String Template Literals
- Work with common operators/methods
Primitive Types:
- Number
- String
- Boolean
- Null
- Undefined
Running Code in the JS Console
Normally, code is written in a separate .js file. For this first module the Chrome Developer Console will be used. The console is mainly used for testing and debugging purposes, not for actually writing your JavaScript.
Introducing Numbers

JavaScript does not store an infinitely precise number, 1.0000000000000009 becomes 1.

The modulo operator is a little bit different than regular division. What is does is it takes 2 numbers and divides them, and returns what's left over. For example... 27 % 2 = 1 because 2 can go into 26 evenly, so with 27 there's 1 that can't go in, so that's our remainder.
Another operator that is less well known is the exponential operator, and it's used for things like squaring and to the x power of. 2 ** 3 = 8, or 5 ** 2 = 25.
JavaScript numbers follow the rule of PEMDAS, so 3 - 9 * 2 will give us -15
NaN & Infinity
NaN is a numeric value that represents something that is not a number. Some ways we can get NaN is by dividing 0 by 0, or by adding a number to NaN.
Infinity is a special value that we can get by doing something like 1/0. There's also -Infinity which can be accessed with -1/0.
Numbers Quiz
What does these evaluate to??
Variables & Let
Variables are like "Labeled Jars" for a value in JavaScript. We can store a value and give it a name, so that we can...
- Recall it
- Use it
- Or change it later on
The basic syntax of a variable using let looks like this... let someName = value;
Updating values
We cannot redeclare already defined variables. We cannot use reserved words such as let, const, document, etc... for variable names.
Unary Operators
Instead of writing score = score + 10; to update a variable, there's a shorthand method which will do the same thing. score += 1; will take score and add 1 to it.
score -= 100; will decrease the variable by 100.
Unary Operators are operators that only have one side. An example of a Unary Operator is score++ which will add 1 to the score variable.
Introducing Const
const works just like let, except you cannot change the value once it is set.
So then why would one use const? Here are some example scenarios.
The Legacy of Var
Before let and const, var was the only way of declaring variables. These days, there isn't really a reason to use it.
Variables Quiz
Evaluate these JavaScript problems.
How to Model Data Efficiently
Booleans Intro
Booleans are always either true or false, there is no in-between.
Some examples of Boolean uses...
JavaScript variables can change type. If it's originally a string, we can assign a number value to it without any problems.
Strings
In JavaScript, strings are pieces of text, or strings of characters. We wrap them in quotes, either single or double quotes, it doesn't matter as long as they start and end with the same quote value they started with.
We can also use the typeof operator to see what type a variable or value is.
When we add 2 strings together that's called concatenation.
String Indices
Strings are indexed. Each character has a corresponding index (a positional number) that starts counting at 0.
Character can include spaces, periods, etc...
If we want to pull a certain character out of a string we can use something like... myString[2]
String Methods
Strings come with a set of built-in methods, which are actions that can be performed on or with that particular string. String methods look like thing.method().
We can do things like...
- Searching within a string
- Replacing parts of a string
- Changing case (upper/lowercase)
Strings are immutable, but the methods will still work for the first calling of the variable.
If we want the changes to persist, we can reassign the variable with the string method included.
Another useful method is .trim(), and it just removes leading and trailing and whitespace.
Methods can be chained together, so calling .trim().toUpperCase() is still valid.
More String Methods
Some methods accept arguments that modify their behavior. We pass these arguments inside of the parentheses.
thing.method(arg)
indexOf:
slice:
replace:
Strings Quiz
String Escape Characters
String Escapes:
- \n = newline
- ` = single quote
- \" = double quote
- \ = backslash
String Template Literals
Template literals are strings that allow embedded expressions, which will be evaluated and then turned into a resulting string. Template literals use back-ticks, not single quotes.
Variables and simple JavaScript code can also be added into the template literal and they will be added into or modify the string.
When we add a variable into our string we are interpolating.
Another Example:
Null & Undefined
Null:
- "Intentional absence of any value"
- Must be assigned
Undefined:
- Variables that do not have an assigned value are undefined
The Math Object & Random Numbers
The Math object contains properties and methods for mathematical constants and functions.
Think of the math object as a collection of math equations.
Random Numbers:
Math.random() gives us a random decimal between 0 and 1, but not including 1 (non-inclusive).
If we wanted to generate a random number between 1 and 10:
typeof Operator
typeof will return a string containing the type of whatever is referenced after the keyword.
You don't need to add parenthesis to use typeof. It is an operator, same as +,-,etc...
parseInt & parseFloat
Used to parse strings into numbers, but watch out for NaN!
Controlling Program Logic and Flow
Making Decisions in JavaScript
There are lots of branching decisions to be made in JavaScript. Think of sign up forms, landing pages, logged in vs logged out, chess websites, YouTube playlists and likes and recommendations, etc...
Goals:
- Understand Comparison Operators
- Write Conditionals
- Work with Boolean Operators
Comparison Operators

Simple comparison operators can compare strings. The way that JavaScript determines the value of these strings is based on Unicode Standards. If the character is found in the Unicode before another character then it has a higher value.
Double Equals (==)
== (double equals):
- Checks for equality of value, but not equality of type.
- It coerces both values to the same type and then compares them.
- This can lead to some unexpected results
Triple Equals (===)
Triple equals checks for equality of value and type.
Go with triple equals!
Strict inequality returns true if the operands are not equal and/or not of the same type.
Running Code From a Script
The console is good for writing one line JavaScript equations, but it's not how to write long JS files and web apps. To do that, we need to have a JS file and link it to an HTML file. This can be accomplished by making a file ending in .js and adding a script src attribute to the HTML.
Once the JavaScript page is linked into the HTML file, how do we get it to show data? One way of getting output is by using the console method. When using console.log() anything inside, as long as it's valid JS, will be printed into the console of the developer tools.
Some uses of console.log():
if Statements
if statements have 3 levels. if, else if, and else.
if: Run code if a given condition is true
else if
If not the first condition, maybe this other condition?
You can have multiple else ifs in your if statements. else if is only valid if there's an if before it.
else
If nothing else is true, run this code.
There's no need for parenthesis or arguments with else because the only time it runs is if nothing else in the if statement is true.
Nesting Conditionals
Conditionals can be nested inside of each other for more logical statements.
Truthy & Falsy Values
- All values have an inherent truthy or falsy boolean value
- Falsy values:
- false
- 0
- "" (empty string)
- null
- undefined
- NaN
- Everything else is truthy!
A common use for truthy and falsy values is to simply pass a variable into an if statement and use an else value in the case that it's false. In the example below, by not assigning loggedInUser a value, we are leaving it undefined, which by default is a falsy value, causing the if statement to resort to the else statement.
Logical AND (&&)
Logical Operators: &&, ||, and !.
AND (&&): Both sides must be true in order for the whole thing to be true.
Logical OR (||)
If one side is true, the whole thing is true. Multiple OR statements can be chained together.
NOT Operator (!)
!expression returns true if the expression is false.
A double NOT operator can be used to determine the value of something. For example, !!null would give us false, and this would be correct because null is a falsy value.
A real life example could look something like:
Operator Precedence
What would be the outcome of this statement:
This evaluates as true, because of the order of operator precedence.
The AND operator is first in this statement, which means it takes the left and the right and evaluates those. Once it has the value of false from the AND, it goes on to the OR operator, which has one true side and one false side which makes the whole thing true.
To check the precedence of operators, check on this MDN page.

The Switch Statement
When does a switch statement come into play?
Imagine a numeric variable, say 4, that represents a day of the week. So 4 would equal Wednesday. As of now, we would probably write a day to number checker by using a ton of if and else if statements and check it against every day of the week until we find a match.
Ternary Operator
The ternary operator is a very simple operator that has just 3 pieces.
It looks something like this
condition ? codeIfTrue : codeIfFalse
Instead of writing this:
We can write it like this:
What's happening is we're putting what would normally go in the if() parenthesis, and we're putting a question mark after that saying, if this first statement is true, then we need to run this code, otherwise do what comes after the colon.
Capture Collections of Data with Arrays
Creating Arrays
Goals:
- Work with Arrays
- Write Object Literals
- Understand Reference Types
- Use common Array/Object methods
Arrays are ordered collections of values.
- List of comments on IG post
- Collection of levels in a game
- Songs in a playlist
- Comments on Reddit or blog posts
Creating Arrays:
Array Indices
Arrays are indexed. The index numbering starts at 0, but if something like .length is called it will count from 1.
Modifying Arrays
Arrays are mutable, meaning we can change the original Array value.
If we wanted to change a value that is already in an Array, we can just reassign the value of the array.
Push and Pop
Array Methods:
- push - add to end
- pop - remove from end
- shift - remove from start
- unshift - add to start
When we call one of these Array methods, we are mutating the original array. If pop() is called numerous times, then the original Array is losing all of the values stored inside because we are actually editing the Array.
Shift and Unshift
Array Methods:
- push - add to end
- pop - remove from end
- shift - remove from start
- unshift - add to start
Unshift can include multiple items, but the behavior when using unshift for one vs multiple items is different. If it's one item, it's added to the front like we would expect. If it's multiple items, they're added as a block in the same order that you wrote them.
Concat
More Array Methods:
- concat - merge arrays
- includes - look for a value
- indexOf - just like str.indexOf
- join - creates a string from arr
- reverse - reverses an array
- slice - copy portion of an arr
- splice - remove/replace elements
- sort - sorts an array
concat is used to merge two or more arrays.
concat can take multiple arrays as arguments if needed.
Includes and IndexOf
includes simply checks if there's a specific value in an array. It doesn't recognize values that only include part of an argument, like searching for corn in corn starch would not return anything.
indexOf returns a numeric value of where the value is in the array, starting from 0.
Reverse and Join
Array.reverse() reverses the original Array. The first array element becomes the last, and the last array element becomes the first.
Array.join() will insert a character between every value of the array. If numbers are joined to the array they will be automatically converted into strings.
Slice
slice() doesn't modify the original array because it returns a new array.
The counting is a bit strange, slice() starts counting from 0 on the first number but then if you want another value to be included you go past that, or, after the first number you start counting from 1 instead.
If a negative number is selected, it will start counting from the end of the array.
Calling slice() without any parameters makes a new copy of the array, this is something people will do to make a quick copy.
Splice
The splice() method changes the contents of an array by removing or replacing existing elements and/or adding new elements in place.
The syntax is, start count, delete count, item to add.
Notes available with video Splice
Sorting (Part 1)
The sort() method sorts the elements of an array in place and returns the sorted array. The default sort order is ascending, built upon converting the elements into strings, then comparing their sequences of UTF-16 code units values.
Most people don't use array.sort() as-is, instead, a function is usually passed in which will give more control over how the array items are sorted. We will come back to sorting after the functions module.
Intro to Reference Types
There's a difference in the way that primitive types and value types variables work with reference types. For example, strings are primitive types and are not updated through variable paths, like shown.
However, the case is different with arrays and objects
To sum it up, primitive types are stored as the actual value in a variable. Arrays are different, instead the variable stores a reference to where that array is in memory.
Using Const with Arrays
Using const, we can't reassign the value of a variable because it is a constant. We can however, change the value. We can change the value as long as the reference remains the same.
Here we are changing the value in the array but not reassigning anything.
Working with Nested Arrays
Arrays can easily be nested inside each other. You can have an array that contains another array, then a boolean, then a number, then another array, because it's just treated as another value in the array.
To access values in nested arrays, just use 2 indexes.
A good example of a nested array would be a tic tac toe board.
Objects - The Core of JavaScript
Intro to Objects
Arrays are great for when you have some ordered information, but what if you have a dashboard for some information. An object lets us group pieces of data together and it allows us to specify labels.
Objects:
- Objects are collections of properties
- Properties are a key-value pair
- Rather than accessing data using an index, we use custom keys
Objects are sometimes called dictionaries, because you have the word you're looking for, and then you go find the value of the word in the dictionary.
Object syntax looks something like this
Creating Object Literals
One way to access data from an object is to use the dot syntax.
fitBitData.totalMiles // 211.7
All keys are converted to strings * except for symbols, which we haven't covered yet.
Order is not crucial with objects, they are usually sorted alphabetically by the browser but if we need an ordered list of data then we use an array.
Just be sure to add a comma when you're done with the property so it knows to separate the properties.
Accessing Object Properties
If we use a number as our key in the key value pair, we can't access that key using the dot notation. We can try and access it using the bracket notation. Objects turn all the keys into strings so we could use a string number value or a real number value in the bracket notation.
When else would we use the square bracket notation? If we were using a variable of if we had a key that was a string with spaces or started with a number. When using this notation be sure to access your keys using strings.
Adding and Updating Properties
How do we add or update a property on an object? There are 2 ways, we have the square bracket notation or we have the dot notation.
When we're using the square bracket notation we have to use a string when referencing our key.
Nested Arrays & Objects
If we want to access data that is nested we can just go down the line and find it. students.nick.math.grade or students.nick.math[0].
A common nesting pattern is to use an array and inside the array add objects. This is useful for a shopping cart array or something, because it keeps the data ordered but also allows key value pairs that are useful for describing products.
Objects and Reference Types
Objects are reference types, think of it like an address. When we define a const and a variable for a object, the variable is not storing the values of the object it's simply storing the address to where the values are located. So when we set another const equal to the original object and change the second one, it will change things for the first one because they are both pointing to the same address.
Array / Object Equality
What if we had 2 arrays that looked exactly the same, and we tried to compare them with double or triple equals? They wouldn't be equal, we would get false. The reason that it would return false is because of reference types, remember the values aren't stored in the variable name but the address is, so even if it looks the same it will have a different address because it is a different variable.
The World of Loops
Intro to Loops
Goals:
- Write for loops
- Write while loops
- Avoid infinite loops
- Iterate over arrays and objects
Loops: Doing things repeatedly
- Loops allow us to repeat code
- Print "Hello" 10 times
- Sum all numbers in an array
- There are multiple types:
- for loo
- while loop
- for...of loop
- for...in loop
An example of this is Reddit. Each post in an objects and a key would be something like username, another key would be title, etc... and all these posts (objects) are contained in an array. That array is then looped over and HTML is made for each object in the array.
Another example is the game 2048. There's a loop that runs on every key press and as long as there's moves available to be completed, it will keep running... otherwise if there's no movements available, the loop ends.
For Loops
A for loop is similar to a conditional, here's some example syntax.
for([initialExpression];[condition];[incrementExpression])
Infinite Loops!
An infinite loop is when you write a loop where the conditional will never be true. If in infinite loop happens, the browser will lag out and eventually ask if you want to kill the task. Here's an example.
For Loops & Arrays
There are many use cases where we would need to loop over an array using a for loop.
Nested For Loops
For loops can be nested inside of each other, and if the first for loop runs, then the second one can run. However, once the second for loop starts running it will need to loop over everything before the next for loop can start again. An example of where we could use nested for loops is adding numbers in an array box.
Intro to While Loops
A While Loop continues to run as long as its test condition is true.
With a while loop, we have to define the variable outside of the loop and increment it inside of the loop, so it is a bit messier than a for loop.
for vs while:
More While Loops
While loops are great for a situation where we don't know how many times we need to loop, but we know we need to keep looping until a situation is met.
For example, a random number target and a random number that tries to guess that target number, so while the random number is trying to get the target it needs to just keep guessing.
Break Keyword
There's a keyword called break that allows us to break out of loops and stop the exectuion whenever JavaScript comes across it.
It's not super common to use break because we define our own rules when writing loops so we should be able to end our own loops.
If you have a nested loop and break in the nested loop it doesn't break all the loops above.
One use case is with a while loop. You could say while(true) to keep the loop running until we make a break statement.
For...Of Intro
The for of method helps us write cleaner for loops over iterable things.
For vs For Of:
What's happening is that we're assigning a variable to hold all the data from when we loop over the iterable. So in this case we are assigning subs to hold all the data we get when we loop over subreddits.
Comparing For and For...Of
There are different situations where we would use for vs for of. If we need the exact index of something in an array and we're comparing that index to another index in another array it would be easier to use a for loop. If we just have one array that we're looping over, a for of loop might be easier.
For...Of with Objects
If we try to use for...of to iterate over a regular object, we get an error saying that the object is not iterable.
We have 2 properties available to help us with objects. Object.keys() will give us an array containing strings of all the keys in the object. Object.values() will give us an array containing all the values.
So how can we loop over objects using these methods?
For...In Loops
The For...In loop loops over the keys in an object.
This is very similar to the Object.keys method we used earlier but this will automatically loop over the keys for us.
Writing Reusable Code with Functions
Our First Function!
Goals:
- Write valid functions
- Write functions with arguments
- Compare function expressions & function statements
- Write a bunch of functions!
Functions are reusable procedures
- Functions allow us to write reusable, modular code
- We define a "chunk" of code that we can then execute at a later point
- We use them ALL THE TIME
First we define a function, which is kind of like registering our function. Then we run our function.
The first kind of function we'll define is a function declaration, or a function statement.
function funcName(){//code}
After we write our function, we have to call it for it to run. We can call it by writing the function name with parenthesis. funcName()
Dice Roll Function
We can also call function within other functions.
Introducing Arguments
Right now, our simple functions accept zero inputs. They behave the same way every time.
If we want to make our functions dynamic and change based on the content we give it, we need to add an argument. We do this by adding a temporary placeholder "variable" of sorts in the parenthesis of the function name.
Functions With Multiple Arguments
The correct terminology for functions is as follows.
When we're writing our function and we give it that temporary variable name, that's called the parameter. When we're calling our function and adding data to our parameter, that's called an argument.
There are a few problems with the following function. The first problem is that if we input a string or a different type than number, we get NaN back, and if we don't put in our second argument, we will get undefined.
The Return Statement
Built-in methods return values when we call them. We can store those values.
Right now, our functions are printing out data but not actually storing any data as a return value. All we have to do to get a return value, we just use the return keyword.
return can only return one value, even though there can be multiple return statements in a function.
More on Return Values
The return statement ends function execution and specifies the value ot be returned by that function.
Here's an example of a function that can be greatly shortened by making use of the return keyword.
These two functions will do the same thing but one is much shorter. The reason why the second one can be so much shorter is because a return statement will always stop the flow of code once it is reached, and we're asking it to return a value based on some expression so there's only two options anyways.
How would we make a loop that goes over an array of colors that returns true if it contains purple but will return false if a given color is not found after looping through the whole array.
Function Challenge 1: passwordValidator
In this challenge we were told to write a isValidPassword function. It will accept 2 arguments: password and username. The password must be at least 8 characters, not contain spaces, and cannot contain the username. If all requirements are met, return true, otherwise return false.
We also could have written this using conditional logic (|| &&) in a if statement. We also could have written this using variable that store true or false based on our requirements.
Function Challenge 2: Average
In this challenge we were told to write a average function to find the average value in an array of numbers. I did this using a regular for loop as well as a messy forEach function.
We don't need both the averageArray array and an array in the function but either will return the same result.
Function Challenge 3: Pangrams
Write a function called isPangram, which checks to see if a given sentence contains every letter of the alphabet. Make sure you ignore string casing!
Function Challenge 4: Get Playing Card
An Advanced Look at Functions
Function Scope
Goals:
- Understand scope
- Write higher order functions
- Pass functions as callbacks
Scope: Variable "visibility"
- The location where a variable is defined dictates where we have access to that variable.
Function Scope:
The variable msg has been declared in the function scope and is available for anything in the function, but when we try to access it outside of the function it's undefined because it's not available in the global scope.
Block Scope
In the case of a block statement, maybe like an if statement, any variables inside of that will be scoped to the block statement.
If we did this same code block using var, we would get different results because var is not scoped to the block statement which it is defined in.
Lexical Scope
If we have nested functions and we declare variables in the parent function, we still have access to the variable in the inside function.
This is a one way relationship, if we define a variable inside the inner function, we cannot access it from the outer function.
If we have multiple nested functions, and the function needs to look up for a variable that is declared somewhere above it, it will stop at the first one it finds.
Function Expressions
So far, we've been defining our functions using function statements, which is where we do something like function add(){}.
But there's another way we can define a function, we can use a function expression.
The reason we can define a function like this, is because functions are technically just objects. This means that we can store them in variables.
The ES6 method of arrow functions often follows this same syntax.
Higher Order Functions
Functions are objects. This means that we can hold the references in arrays or objects, and loop over each function, and call they dynamically, etc...
By adding a function to an object, we are creating a method.
Functions as Arguments
Higher Order Functions: Functions that operate on/with other functions. These higher order functions can:
- Accept other functions as arguments
- Return a function
Functions as arguments:
If we have a function that we want to call x number of times we can initiate a for loop that will loop through a given amount of times, say as many times as the number we give it which is a parameter, and call the function through on each loop.
Functions as Return Values
We can call / define functions as return values.
Callbacks
A callback function is a function passed into another function as an argument, which is then invoked inside the outer function.
Sometimes, instead of passing in a function that we have already written as a callback function, we could pass in an anonymous function.
Hoisting
When we try to run some code that looks like this...
What JavaScript is actually doing looks more like this...
This is because it will "hoist" var to the top, but won't bring the values up to the top.
If we tried to do the same thing with let that we did with var, we would get a ReferenceError saying that we cannot access the variable before initialization.
This means that let and const are not hoisted, meaning they won't be brought up to the top to be accessed.
Functions however, are hoisted. You can define a function and call a function from anywhere in the script. But, if we use a function expression, aka a function stored in a variable, there is no hoisting to be found.
Apply Functions to Collections of Data
Intro to Array Callback Methods
Array Callback Methods:
- Arrays come with many built-in methods that accept callback functions
- Now that we've covered callbacks, we can learn these methods!
- SUPER USEFUL!
Goals:
- Use the new arrow function syntax
- Understand and use these methods:
- forEach
- map
- filter
- find
- reduce
- some
- every
forEach
forEach accepts a callback function. Calls the function once per element in the array.
We can also use a second parameter in a forEach loop which will automatically give us the index.
Map
map creates a new array with the results of calling a callback on every element in the array.
forEach is something similar that we've seen to map, it is different however in the fact that map will return us a new array containing all the values we mapped over.
Arrow Functions Intro
Arrow functions are a syntactically compact alternative to a regular function expression.
A simple example...
Parentheses are optional if there is only one parameter. Use empty parentheses for functions with no parameters.
Arrow Functions: Implicit Returns
Implicit returns allows us to write an arrow function that is even smaller than a typical arrow function. We can use an implicit return in a scenario where we have 1 expression that we want to be returned, we can return that without a return statement.
Array.find
Array.find returns the value of the first element in the array that satisfies the provided testing function.
Instead of simply storing true or false, we can think of .find() as more of a testing suite. We pass in some value we want our answer to contain, and if something matches that value and returns true, we get the whole value as opposed to a boolean, which we can then store into a variable.
Filter
Creates a new array with all elements that pass the test implemented by the provider function.
Some & Every
every tests whether all elements in the array pass the provided function. It returns a boolean value.
some is similar to every, but returns true if ANY of the array elements pass the test function.
Revisiting Sort!
Sort Pt. 2
arr.sort(compareFunc(a,b))
- If
compareFunc(a,b)returns less than 0- Sort
abeforeb
- Sort
- If
compareFunc(a,b)returns 0- Leave
aandbunchanged with respect to each other
- Leave
- If
compareFunc(a,b)returns greater than 0- Sort
bbeforea
- Sort
When we sort our array, we are modifying the original array "in place". If we wanted to create a copy of an array and not touch the original, we could add .slice() in to make a copy.
Reduce Intro
reduce executes a reducer function on each element of the array, resulting in a single value.
You can think of it with these examples.
reduce could be used to take an array of 100 numbers and reduce those numbers into one number. The one number being the maximum value if you added them all together.
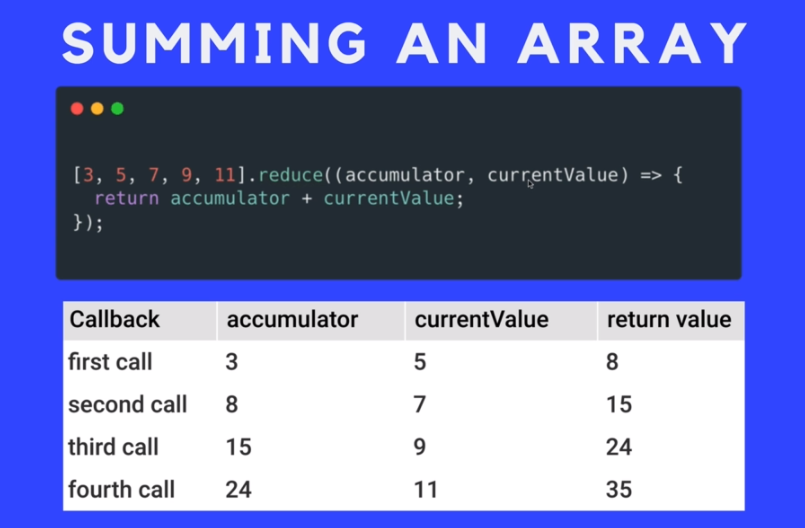
We have 2 parameters when using reduce.
The first one is known as accumulator or total, and this first one will store the end result of reduce.
The second one is called currentValue, or val and this represents each individual element as reduce goes through all the options.
What if we wanted to take an array of numbers and return one number which is the result of multiplying every number.
Reduce Pt. 2
What if we had an array of numbers and we wanted to find the largest number and return said number. We could use a reduce function.
An alternative to this would be to use Math.max() which takes some numbers and returns the largest number.
One other thing you can do with reduce is define your own starting value at the end of the function.
Even More Reduce!
What if we wanted to count the number of "y" or "n" in an array so that we could tally votes, we could use reduce to put the count of both into an object.
A Few Miscellaneous JavaScript Features
New JavaScript Features Intro
Goals:
- Work with rest & spread
- Add default function parameters
- Understand destructuring
Default Parameters
Say we had a function that takes in 2 arguments and returns the value of them added together or something. If we leave off a parameter when we're calling the function, we often times get undefined. A solution to this is to wrap the argument in an if loop saying, If this is not equal to undefined, then execute the function. But, there's a shorter way.
The default parameters need to come at the end of the argument list. You also can't access a default parameter that is at the end without first filling in the parameters before said default.
Spread for Function Calls
Spread syntax allows an iterable such as an array to be expanded in places where zero or more arguments (for function calls) or elements (for array literals) are expected, or an object expression to be expanded in places where zero or more key-value pairs (for object literals) are expected.
The first example of spread that we'll see is spread for function calls. This expands an iterable (array, string, etc.) into a list of arguments.
Instead of passing the whole array as an argument into the function, by using spread, we take each individual element inside and pass it in as its own argument.
Spread in Array Literals
Using spread in an array literal creates a new array using an existing array, and spreads the elements from one array into a new array.
Spread in Object Literals
Spread in object literals copies properties from one object into another object literal.
If we have a key in something that we're spreading and we have the same key defined again in our object declaration, the most recent one will be the one that is displayed, so it can overwrite whatever is in the spread.
If we try to spread an object literal into an array literal, we would get an uncaught reference error. We have to spread object into objects and etc...
The Arguments Object (not new)
rest. It looks like spread, but it's not!
What if we wanted to support as many parameters as we wanted without hard coding them in?
We have access to an arguments object that lets us do this.
The arguments object
- Available inside every function
- It's an array-like object
- Has a length property
- Does not have array methods like push/pop
- Contains all the arguments passed to the function
- Not available inside of arrow functions!
Rest Parameters (new!)
Rest params collects all remaining arguments into an actual array.
When we define it as collecting all "Remaining Arguments", that means all the arguments that don't match with a parameter. So we wouldn't have multiple rest statements because it claims everything besides pre-defined arguments.
Destructuring Arrays
Destructuring is a short, clean syntax to "unpack":
- Values from arrays
- Properties from objects Into distinct variables.
We can add extra commas to skip indexes.
Destructuring Objects
In array destructuring, we would make variables based on the indexes of properties, but in objects, we use the keys to create our variables.
We can also use the rest operator when destructuring objects.
Nested Destructuring
If we have an array with lots of unnamed objects inside that are all very similar, we can destructure based on index.
Destructuring Parameters
Another way we can use destructuring is by unpacking parameters into separate variables from objects or arrays.
Object Methods and the This Keyword
Shorthand Object Properties
Goals:
- Add methods to objects
- Use new object shorthand syntax
- Use computed properties
- Understand prototypes
- Explain how the %\$@# this works
If we want to have an object where the key and the value variable are called the same thing, we can just write the value once because the key and the variable are the same.
Computed Properties
We can use a variable as a key name in an object literal property!
Adding Methods to Objects
We can add functions as properties on objects. We call them methods. This simplest reason that we could do this is to group functions together.
Method Shorthand Syntax
There is a shorthand syntax that allows us to work with arrow functions as methods.
Intro to Keyword THIS
Think of the this keyword as a reference to the current execution scope.
For example, if we declare a regular function, a function in the global scope, in our script and console.log(this), it will give us a window object.
Using THIS in Methods
Say we have an object with a method, and in the method we're console logging this, does it reference the window or the object? It will actually return the object.
This is useful for us because it means that our function is aware of other keys in the object that it is located in.
If we want to call a function inside of a other function that's a method we need to use this beforehand so it knows where to look for the function.
THIS: Invocation Context
The value of this depends on the invocation context of the function it is used in.
If we have a function that is using this as a method on an object, and we assign a variable to said function outside of that object scope, this will be set to the global window.
Until we learn something like bind, we don't get access to the this keyword while using arrow functions as methods.
Annoyomatic Demo
We want to have an object that contains an array of annoying phrases, and we're going to use setInterval() to run it after x amount of times and print annoying phrases to the console.
If we have a function, and inside that function we use setInterval() with the this keyword, does that provide us with access to the object that it's located in or the window object? It will give us the window object because we are not the ones who are executing the setInterval(), that's being done by the window object after we initially call the parent function that holds setInterval().
But, if we use an arrow function we get a different this because arrow functions don't get their own this.
If we want to eventually stop our interval from running we can use clearInterval() and that will take an ID that we can use to stop interval execution.
Putting It All Together: Deck of Cards
In this module, we looked at how we could make a deck of cards that includes some options like selecting the number of cards draw, and removing the card once it has been picked. First we looked at how it could work using mostly functions, then we looked at how an object based implementation would work using this and methods.
Creating a Deck Factory
Before we learn about constructors and classes and all the ES6 syntax, there is a dirty approach that we can use to create multiple copies of a specific object.
All we need to do is make a function that will return our entire deck object and we can assign variables equal to the function call and have multiple instances of our deck.
JS in the Browser - DOM Manipulation
Introduction to the DOM
The DOM allows us to create countless forms of interaction with webpages.
Important Note: HTML & CSS
Make sure you are comfortable with basic HTML & CSS
This video was a review of some basic HTML and CSS concepts.
Taste of the DOM
What is it?
- The DOM is a JavaScript representation of a webpage
- It's your JS "window" into the contents of a webpage
- It's just a bunch of objects that you can interact with via JS
Every HTML element is actually a JavaScript object, and as such it has a large number of methods available to us, we can see the id, classes, value, and so many other things. Being an object, we can change the key value pairs of things to represent different values we want.
Another Fun DOM Example
In chrome dev tools, there is a page called snippets that allow us to write some little scripts that are stored in chrome and that we can then run in certain pages.
This lesson was more about showing some of the things we can do to the webpage using JavaScript. For example we took an image and made it spin around and randomly move around the page.
The Document Object
Starting with the Document: The document object is our entry point into the world of the DOM. It contains representations of all the content ona page, plus tons of useful methods and properties.
If we want to see all the properties of a specific websites document object, we can type
console.dir(document) and see what's going on behind the scenes.
getElementById
If we want to change something on our DOM, first we need to select something, and then we can manipulate it.
Selecting:
- getElementById
- getElementsByTagName
- getElementsByClassName
When we pass in a element that we want to find, it will return the whole object to us and we can manipulate anything related to that object that it returns to us.
getElementsByTagName
getElementsByTagName gives us a list of all the elements that match the tag name we placed in.
It gives us an HTMLCollection, which is not an array, it is actually more of a list or collection.
While it is not an array, we can do some array-like things.
We can use square bracket notation to access index-based elements.
We can also iterate over using a loop.
We can also use spread to create an array out of the collection.
getElementsByClassName
Very similar to getElementsByTagName in the idea that it returns a collection of elements, and we can iterate over and select individual elements and change things etc.
Something we can do is get the specific elements by class name inside of a specific element by tag name. So li = tagName and then inside of that we do li.className and then we can store that into a variable. This method doesn't work with getID because ID's are supposed to be singular and specific.
querySelector & querySelectorAll
A newer, all-in-one method to select a single element. All you have to do is pass in a CSS selector.
querySelectorAll() does the same thing as querySelector(), except it returns a NodeList of all the items that match. This NodeList is different than an HTMLCollection in the idea that it's very similar to an array, and with querySelectorAll() we get access to forEach.
Because we're passing in a CSS selector, we can do more advanced CSS selectors like
section ul li.special.
Twisting the DOM to Our Will!
Working with innerText & textContent
Properties and Methods (The Important Ones):
- classList
- getAttribute()
- setAttribute()
- appendChild()
- append()
- prepend()
- removeChild()
- remove()
- createElement
- innerText
- textContent
- innerHTML
- value
- parentElement
- value
- parentElement
- children
- nextSibling
- previousSibling
- style
innerText will give us the text that is inside of the tags. If we call innerText on a parent element, it will also give us the text of its children as well.
textContent will give us a more accurate depiction of what the text looks like, but if we have some text content hidden with CSS, textContent will still be able to see.
innerHTML
innerHTML will give us all of the text and the elements included as a string.
This allows us to set entire HTML documents as strings, and we can update or remove or fetch whatever we need. This is not the best or safest way to edit HTML as there are methods to add elements to the document and innerHTML can be used for scripting attacks.
We can use tags inside of our strings, whereas if we tried to do the same thing in innerText, it would use the tags as part of the string you are setting.
value, src, href, and more
If we have an input and we want to access the value of the input form, we have a .value property. input.value. We can also set the value using input.value, this could be used to reset the value to nothing by setting an empty string.
If we have a checkbox and we want to see if they're checked, we have a checkbox.checked property.
We can change the placeholder text of an input by using input.placeholder = "string".
We can change the href of a link by using link.href = "link".
We can change the src of images by using image.src = "source".
Getting & Setting Attributes
getAttribute() allows us to view the values of specific attributes that are set on that element. element.getAttribute("type").
We can use setAttribute() to set attributes on elements. It takes 2 arguments, 1 is the attribute we're trying to set and the other is the value of the attribute we're setting.
Finding Parent / Children / Siblings
parentElement gives us the parent element of whatever element we're calling it on, we can also stack parentElement calls on top of each other and eventually we'll get to the HTML element/tag.
children will give us all the children of the selected element.
nextElementSibling will give us the next sibling of whatever we have selected.
previousElementSibling will give us the previous sibling of whatever element we selected.
Changing Multiple Elements
If we select all elements through something like querySelectorAll and assign them to a variable, we can make a for loop that will then do something to all of them by using the i index.
The code above will take any li and change its inner text content to "Go crazy go stupid ahhh" because we're selecting all of them and modifying each one through their index which we got from the for loop.
Altering Styles
An important note about the style property on JS is that we can use it to set styles on elements but we cannot use it to read the styles that are already applied (unless they're inline styles).
When we're setting styles in JS using .style we have to use different syntax than CSS. In CSS, we would use background-color but in JS we camelCase everything so it would be backgroundColor = "black".
Using the .style adds inline styles which are highly specific and will beat out classes and id's for style specificity.
getComputedStyle
If we select an element and assign getComputedStyle to it, it will return us with an object like syntax that contains all the CSS styles that are applied to the element.
Computed styles is a great way to see what's actually being rendered / styled on the page. If you have a lot of classes and styles and don't know what has higher precedence, getComputedStyles will tell you what's really being applied.
Manipulating Classes
What if we had some markup, maybe a todo list, that we are going to be applying different style changes to based on user interaction. Normally, we might make a new line of JS and use .style to change individual styles on our elements, but an easier way would be to add a separate class based on user interaction.
One option we have to add classes is with setAttribute("class", "className"), but this will completely overwrite whatever class we already had set, what we need is an option to add or remove additional classes without touching our original classes. We can do this by using classList.
classList gives us the option of add, remove, or toggle. By just typing classList, it will give us a token list (kind of like an array) containing all of the classes that are currently set on an element. .toggle() will give us an easy option to either add or remove classes from an element. It saves us the trouble of checking if a element contains a class, then either adding or removing.
Creating Elements
document.createElement() is fairly simple, it just asks for a string containing the element we would like to create. We can then store our new element in a variable and access that variable to use something like textContent or classList.
But how do we add our element onto the page? First, we need to select an element to append it to. Our first option is called appendChild() and will append whatever we pass in as a child of the element we call it on. This method will append our element as a last child at the bottom of the element.
Append, Prepend, & insertBefore
appendChild() is great when we're adding things to the bottom of an element, but what if we need to add something to the top or some other location besides the bottom? This is where append and prepend and insertBefore come in handy as they allow us to add elements to the top or before some other element.
insertBefore is a method that is called on the element we're trying to insert something into. So we would say parentEl.insertBefore(newDiv).
insertAdjacent will give us 4 options of where we can pass in specific elements, these options allow us to insert before middle after etc..
append and prepend are simpler than insertAdjacent. All we need to do is pass in the name of the parent element and then the name of the element we're inserting.
removeChild & remove
removeChild is similar to appendChild in the items we have to pass in. removeChild will take 2 parameters, the first being the parent element, and the second is the element that we're trying to remove.
remove is even simpler as all we have to do is call remove() on the element that we want to remove. We don't have to find a parent element or anything.
NBA Scores Chart Pt: 1
In this video we worked with object data to make a simple table that displays some NBA scores and either a green or red background depending on who won. The winning score is also bolded. We accomplished this with some some object destructuring and updating HTML content via JS.
NBA Scores Chart Refactor
In this video, we refactored the code so that it is more function based and doesn't hard code from a single data source.
Communicating with Events
Intro to DOM Events
A Small Taste:
- clicks
- drags
- drops
- hovers
- scrolls
- form submission
- key presses
- focus/blur
- mouse wheel
- double click
- copying
- pasting
- audio start
- screen resize
- printing
There are hundreds of possible events we can have access to for all types of programming challenges we face. We can access most of these through just 1 single method.
2 Ways NOT to Add Events
Event listeners follow a kind of pattern. First, we're listening for an event on a given thing, like a button or a form, and when we "hear" the event happen on our selected thing, we run the code that is specified in our event listener.
The first 2 options to add event listeners, (HTML onclick, JS .onclick) are not recommended methods.
addEventListener
As we've seen, HTML onclick and JS onclick inline statements are not the best option available to us for working with events. This is where addEventListener() comes in.
addEventListener is a simpler way to specify which event type and then add a callback to run when the event happens.
We can also attach as many event listeners we want to a given element, this means we could add multiple click events or 2+ different type of events.
The Impossible Button Demo
The impossible button is a trick where there's a button on screen and when we try and hover over the button to click on it, it will instantly move to somewhere random on the screen. To accomplish our own impossible button, we need to have a button with an event listener that is listening for mouseover and when that happens it will change the positioning of the button through .style.
In order to keep the button in the viewport, we can access the width and height of a viewport by using window.innerHeight and window.innerWidth.
The solution involves having the button position be absolute and then simply changing the top and left positioning of the absolute element based on screen size available.
We could then add an event listener for click so that if someone actually can click it we display an alert saying good job or something.
Events on Multiple Events
We've seen how we can attach multiple event listeners to a single element, but how can we attach event listeners to multiple elements (like a todo list of li's).
The simple answer is by using a loop and looping over each element and adding an event listener.
We can use this to pass around our element that is being clicked and then we can do specific things to specific elements.
Generally, this will refer to the element that the event listener has been attached to... in this situation.
We can also use forEach to add event listeners to multiple elements.
The Event Object
When we have an event listener that calls a function, we're not actually calling that function because it is being called for us. When this function is called for us from the eventListener it is passed an event object. This event object can be quite useful and provides all the data about what happened in order for the function to be executed.
We get tons of information from the event param, including where the event happened, the key that was pressed, if certain other keys were pressed, keycodes, etc... We get different information depending on the event listener we used.
The event parameter is often called e or event, and it can be accessed like this.
Key Events: keypress, keyup, & keydown
keydown fires as soon as a key is depressed and fires on non-letter keys such as shift and control, and keyup will fire as soon as the key is lifted.
keypress will fire the same as keydown, except it will only fire for regular characters and not for things like shift and control.
keypress wouldn't be a good solution if we're making a game or something that involves using the arrow keys, but if we're just trying to fire it when something visible in the input changes, keypress is our best option because it doesn't care about random keys that don't change the visible input.
keypress does count return as a keypress, and delete is also not considered a keypress.
If we wanted to make a todo list or a form or input that can listen for enter or return as a keypress, we need to use the event object to get the enter keycode on keypress. We can then write an if statement that will execute if the keypress is equal to "Enter".
Coin Game Demo
In this demo, we have a coin animation and a little character walking animation and our logic is that when you press the arrow keys, the player will move based on which key was pressed, and when the character touches the coin, we move the coin to somewhere else on the screen.
Form Events & PreventDefault
By default, when we submit a form we have with HTML, it will refresh the page and send the data to an endpoint of our specification or get data from an endpoint, probably on a server somewhere, to then be validated and added to our database. But we don't always want to refresh the page and send a load of data, sometimes we just want to capture the data and display it to the user. To do this, we can use preventDefault() on our event parameter.
This will prevent the page from reloading and then we can simply assign variables and access the data we want, we could then use a callback function to do something with the data.
Input & Change Events
What if we had an object or some data structure that we wanted to keep live updated with what the user has done so far in the form. So if they check a checkbox it will instantly be set to true in our object, and whatever they have typed so far will also be updated and stored live, as well as any other forms of input. This will give us access to the current data that they are putting in and we can run code based on what's been done so far.
To do this, we can use the input event listener. What this will do is fire the event listener anytime anything in the input that we selected changes. We can pass in our event parameter to find out exactly what changed.
This could also probably be done with a forEach function.
Asynchronous Code, Callbacks & Promises
The Call Stack
The Call Stack is the mechanism the JS interpreter uses to keep track of its place in a script that calls multiple functions. How JS "knows" what function is currently being run and what functions are called from within that function, etc.
A "stack" is similar to a stack of books on your shelf. If you put something on the top, it will be the first thing taken off.
"Last thing in... First thing out".
How it Works:
- When a script calls a function, the interpreter adds it to the call stack and then starts carrying out the function.
- Any functions that are called by that function are added to the call stack further up, and run where their calls are reached.
- When the current function is finished, the interpreter takes it off the stack and resumes execution where it left off in the last code listing.
Here's an example of a function call stack
In this example, our triangle function relies on square function which relies on the multiply function at the very top so we go up the line from the triangle to the square to the multiply and then back down.
Call Stack Debugging with Dev Tools
Once we have our script written, we can access it in Chrome Dev Tools by going to sources, and finding the name of our script. Once we have our script selected, we can add breakpoints in by clicking the left side of the screen where the numbers are.
Once we have our breakpoint set, we can run our script and it will pause as soon as it reaches the breakpoint so we can see what's happening at any time in our application. We also get access to the call stack on the right side of the screen and we can step through our script one line at a time and view what's happening on the call stack.
JS is Single Threaded
JavaScript is single threaded. But what does that mean? At any given point in time, that single JS thread is running at most one line of JS code.
A simple demonstration of JS single threaded behavior involves an alert.
What will happen in the code above is that the first console.log will run and it will say "I happened first" and then the alert will happen saying "Herro", and finally, after we accept the alert, the second console.log will run saying "I happened second".
So what happens to our app when JavaScript is sending out a request to a server for some API data, which we want to accept and display. Is JS going to sit there and wait for something to happen? actually no, we will discuss why in the next video.
How Asynchronous Callbacks Actually Work
We learned that JavaScript is single-threaded, so what does it do when we have some code like this? In the following code, we have no idea how long it will take to save that piece of text to our database, so how long before the form value is reset?
This is where callbacks come in. Callbacks allow us to specify a function that will run at the appropriate time.
An example of a very simple callback...
But how can JavaScript remember to call our function after 3 seconds and continue calling our other functions and not simply grind to a halt and wait for setTimeout to finish? The browser does the work!
But how does the browser work in sync like this?
- Browsers come with Web APIs that are able to handle certain tasks in the background (like making requests or setTimeout).
- The JS call stack recognizes these Web API functions and passes them off to the browser to take care of.
- Once the browser finishes those tasks, they return and are pushed onto the stack as a callback.
This is a helpful site to help visualize the call stack and how the browser APIs play a part in JS execution.
Welcome to Callback Hell
In this video, we look at how a function can use callback functions. As a result of using callback functions, we can find ourselves nesting callbacks 5-6-7+ levels deep and if we include an error callback it doubles our code length. Instead of chaining and passing functions into callbacks which call other callbacks and making a tangled web of function callbacks, we can use Promises.
Introducing Promises
Before, we passed callbacks functions into other callbacks and made a long, ugly, unreadable chain of functions. But there's a better way to do things, and this is where Promises come in. What are promises?
A promise is an object representing the eventual completion or failure of an asynchronous operation. It's a pattern for writing async code.
When we create a new Promise, we pass in 2 parameters, which are functions, called resolve and reject. If we don't call either of those functions after initializing our promise, our promise status is pending.
But how do we run code based on whether or not our promise is rejected or accepted? We have .then() and .catch().
Returning Promises from Functions
Often times, we want to return a promise from a function call. This allows us to make our promise more modular and easy to access, as well as allowing us to chain our catch and then statements to the function once.
Resolving / Rejecting with Values
We've seen that we can use a Promise as a return on a function, and when we call that function we have access to .then and .catch, but how can we return values to .then and .catch? We can add data into our promise and when we call reject or resolve, we can pass in that data and we can access that in our .then by giving it a name like data.
The Delights of Promise Chaining
If we want to query specific data and we don't have access to that data until after we get it from our Promise, we can call another promise that includes data from the first promise. Similar to a callback function passing data to the next function.
Instead of writing our promise chains like that, which looks very similar to callback chaining / callback hell, we can simply return a promise from our .then() function.
Refactoring with Promises
In our previous example we used a lot of callback functions to move the button across the screen, this is how we could refactor that example with promises.
By returning the function that returns a promise initially, we can keep rerunning the function call through .then promise calls.
Making HTTP Requests
Intro to AJAX
AJAX:
- Asynchronous
- JavaScript
- And
- XML / JSON
The idea behind AJAX and asynchronous pages are that we don't have to reload the page every time we want new data. Consider a site like google, where when you search for something the whole page reloads, then consider something like YouTube, where the site doesn't refresh it just gets updated with content.
When we send requests, we are most likely going to be getting JSON back. JSON is an object-like syntax containing lots of data that the server gives us based on what we asked for. We can use the JSON to update our HTML page with the new data.
JSON & XML
XML is kind of like the parent to HTML. It is very old and has similar markup features to HTML. When writing XML, we use HTML like tags to represent parts of the data. When writing JSON, we use JavaScript Object Notation, basically just an object.
Despite JSON being called JavaScript Object Notation, it is not actually JavaScript exclusive code and you can use JSON in any other programming language to build a page from an API JSON response.
XMLHttpRequests: The Basics
- The "original" way of sending requests via JS
- Does not support promises, so lots of callbacks
- Clunky syntax that's difficult to remember
When using XHR (XMLHttpRequests), we can use it to fetch any kind of data from an API, not just XML, we can use JSON which is the current standard.
Below is an example of an XHR request where we get the data and convert it into readable JS code.
XMLHttpRequests: Chaining Requests
If we want to send a request based on some data returned on our first request we have to chain our requests together. Say we send a request to get the users location and we want to pass that data into a weather request to get the weather for the location. First, we make our location call and then we store the result in a variable, then we make our second request and pass the variable in.
A Better Way: Fetch!
Fetch API:
- The newer way of making requests via JS
- Supports promises!
- Not supported in Internet Explorer
When our promise is initially resolved, our data comes back on the body object as something called a readable stream. This readable stream is a stream of byte data. These types of streams are useful for transferring very large amounts of data.
In order to have our stream of data become readable, we need to convert it to JSON. We can do this conversion by using the json() function. This json() function is itself an asynchronous operation, so we need to add a .then to it.
There is a little catch we have to work around with error handling. In our catch(), we pass in an error and we console.log it. One might expect that if there's a 404 response from our API that our catch function would get the error, but that's not how the fetch error reporting works. The catch error will only execute if there's something that prevents us from ever connecting to the API, such as a network error. So how do we get error reporting set up in the case of a 404? We can do that by passing in a check to see if the response.ok property is set to true. We can also throw a new error from our check, and that throw will end up in our catch statement.
Chaining Fetch Requests
If we want to send a request to somewhere based on some data we received with a different fetch request, we can chain our fetch calls together with promises.
Refactoring Fetch Chains
If we want to clean up our fetch chains to be easier to read and easier to add new requests to, we can split a large amount of our code into separate functions and call the functions inside of our fetch requests.
An Even Better Way: Axios
Axios is a library that well help us perform HTTP requests in the browser or in Node.js. It works by using the fetch API behind the scenes and supports promise based requests. Axios will automatically call our .catch function if there is an error, so we don't have to do any additional error throwing. Our Axios response data is automatically parsed from JSON into readable and accessible data.
Example of a HTTP GET request with Axios:
Sequential Axios Requests
Just like we did with fetch, we can string together multiple HTTP requests using Axios.
Async & Await: JS Magic
A Quick Overview of Async Functions
Imaging we had a function that looked like our example below. What happens when we get the data? We can't actually access the data without using promise syntax.
There are 2 pieces involved with using Async functions. These pieces are async and await.
The Async Keyword
The async keyword:
- Async functions always return a promise.
- If the function returns a value, the promise will be resolved with that value.
- If the function throws an exception, the promise will be rejected.
An async function, on one level, is just a shortcut syntax to make a function that returns a promise.
The Await Keyword
The await keyword:
- We can only use the await keyword inside of functions declared with async.
awaitwill pause the execution of the function, waiting for a promise to be resolved.
Error Handling in Async Functions
Previously, we saw how we could use the await keyword to wait for our promise to resolve inside of our function, but we didn't see how we could catch and report any errors.
We have 2 options when it comes to catching errors. One option is using a try catch block inside of our function. Our second option is to add a .catch to our function call.
The difference between these two options is the try catch block allows us to be more specific with our error handling and it will only run when that specific function fails, the other option will catch any error and as such is a less precise option.
Multiple Awaits |REWATCH|
We can pass in multiple await statements by simply returning a promise and then adding await a lot of times.
Parallel vs Sequential Requests
When writing requests, we either write them in parallel or sequentially. Sequential requests wait for the request above to finish before sending the next request. If we write them in parallel, we can fire them off all at practically the same time and await them as soon as they come back in no particular order.
If your requests don't build on each other and you simply need to fire off requests as quickly as possible, just use parallel requests
Refactoring with Promise.all
A shortcut to what we had written above, where we were awaiting each individual promise, we can use Promise.all to await an array of all of our promises.
Prototypes, Classes, & The New Operator
What on Earth are Prototypes?
When we type something into the console, say a empty array, we are given the length as well as something called __proto__. When we click on this __proto__ we see all sorts of common array methods that we've used before to interact with our array. This is done so that instead of having a method called push on every single array we ever make, we can call the reference to the push method that is found on the prototype object. It saves us a lot of storage so that we don't have so many duplicates and can have a single source of reference.
For example, we can add our own method to the String prototype by setting it on the prototype object.
.prototype is the actual object where the prototype functions are stores, and __proto__ is a reference to the original object just mentioned.
An Intro to OOP
The main idea behind OOP (Object Oriented Programming) is that we create a object that contains methods on it and we can type new Color and it will make us a new object and we can still have access to all the methods. This is great for code reusability and understanding what's happening with our code.
Factory Functions
Factory Functions are like a recipe for creating new functions that are tied onto objects.
Constructor Functions
The benefit of this approach is that instead of writing long functions that return other functions which then return objects, this will automatically make us an object and we can add methods to the prototype.
JS Classes - Syntactical Sugar
Classes are a type of syntactical sugar on top of constructor functions.
Above, we are creating a class and adding a constructor function. We can also add "prototype" functions that we can define and call on top of variables that are defined using our new Class. The constructor function will run no matter what every time we create a new instance of our Class using the new keyword and tying it to a variable.
A Bit More Practice with Classes
In this video we worked on adding more methods to our Color class.
Extends, Super, and Subclasses
If we have a lot of functionality that we would want to share between our classes, we can use a parent class and say our children classes extend that class.
super allows us to access the name and age from our Pet constructor.
Drawing Animations
Welcome to Part 2
Part 1: Colt Steele
- Lots of different, individual topics
- Focused on the basic features of JavaScript
- Not too many larger apps
Part 2: Stephen Girder
- Fewer topics
- Focused on design patterns and more advanced concepts of JS
- Nothing but large apps!
- Lots of refactoring
App Overview
This will be a simple 30s timer website with a play and a pause button. The outside border will also revolve around the outside based on the time remaining. The user will also be able to input their own amount of time.
Project Setup
For setup, we created a directory called timer as well as HTML and JS files.
Event-based Architecture
Things our Program Does:
- Displays a timer
- Shows an animated border around the timer
Possible Implementation:
- Event listener to watch for a click on "start" button
- Draw a full border around the timer
- Start counting down the timer
- Each time the timer counts down, update the border
- Each time the timer counts down, update the text
- If we counted down and timer reaches 0, then...
- Reset the border
- Reset internal timer to get ready for another run
If we look at the code above, we have both of the things that our program does mixed together throughout. One is focused on the styling and the other is focused on actually being a timer. What if we took out the styling portions and added them as "event" based code.
Rethought Implementation:
- Event listener to watch for a click on "start" button
- Emit an event stating that the timer has started
- Start counting down the timer
- Emit an event that the timer has "ticked"
- Each time the timer counts down, update the text
- If we counted down and timer reaches 0, then...
- Emit an event that the timer is done
- Reset internal timer to get ready for another run
Class-Based Implementation
A good way to implement this timer would be to use a class and inside the class we can make methods that will control the visual aspects of the timer and some methods that will control the time aspects of the timer.
class Timer includes start(), pause(), onDurationChange(), tick().
For example, whenever a user clicks on the start button we can call the start() method, pause button will call pause(), when a user changes the duration of the timer we can call onDurationChange(), and finally we can use tick() to actually update the numbers on the timer during countdown.
When we initialize our class we can pass in a few callback functions, such as durationInput, startButton, and pauseButton so that our function will have access to the dom elements in the timer.
Binding Events in a Class
In this video, we implemented a simple Timer class that will take dom elements as input and add event listeners and when a button is clicked it will run a custom function.
Reminder on "This"
Say we have the class setup below...
At the bottom, we are initializing our timer to start on page load, but we also can initialize it when we click the start button, but what will the value of this be when we define it on page load vs button click?
When we get the value of this on page load it's going to be Timer {durationInput: input#duration, startButton: button#start, pauseButton: button#pause} which is basically our constructor function. But when we get this off of button click we get <button id="start">START</button>.
Determining the Value of this
How can we determine the value of this inside of our Class?
We can ask a few questions to help determine...
Did you define the function with an arrow function?
- Write
console.log(this)on the first value line above the arrow function. Value ofthisin the arrow function will be equal to that console.log
- Write
Did you call
bind,call, orapplyon the function when you invoked it?thisis equal to the first argument ofbind,call, orapply
All other cases
thisis equal to whatever is to the left of the.in the method call
Solving the this Issue
Of the three ways we could have fixed our problem, we went with the most common which was to make the method on our Class into an arrow function.